Category Archives: Crafting

Hello Kitty Hat

hello kitty hat

Since Christmastime, my three-year-old has been asking me to make her a Hello Kitty hat. And for whatever reason I’ve put it off. I’m not sure why, because hats are quick and easy to whip up. Last week I finally had the time to hook one up for her, and she could not have been happier!

For the hat itself, I used my favorite hat pattern, which at the moment happens to be the one I used to make Repeat Crafter Me’s owl hat. I find it a little small, and I always need to crochet more rows than the pattern calls for, but it is an excellent base pattern. Laura didn’t want earflaps, and I ended up adding a picot border just to make the hat a little bit longer.

For the nose, I followed the directions on Crochet in Color’s Hello Kitty Hat pattern. I also used her basic ear instructions, but I started with a magic circle, ch2, and then 7 hdc. I didn’t connect the end and beginning, I just made a ch1 and followed the rest of her instructions. When I used her method, I was left with a gap I couldn’t seem to tighten up. Using the magic circle helped with that.

For the eyes, I started with a magic circle (can you tell how much I love that nifty little trick?) and then a ch1, and 10 sc. Then I just sewed it all up.

hello kitty hat

I think the nose could go a little lower, but she’s so happy with it, I am not about to start taking it apart and redoing work needlessly. Too many other projects in the queue!

What are you working on at the moment?

Linking up with:
Whatever You Want Wednesday

Take a Look Tuesday

Sleepy Saturday

There’s nothing like a solid three hours of sleep to get you refreshed and ready for the day, right? Sigh, of course I’m being sarcastic. Laura had a later bedtime than usual last night, which naturally resulted in a very poor night’s sleep. I’ve always laughed at people who suggest letting kids stay up later in order to get them to sleep in later. Sure, at Jake’s age this works. But not for the wee little ones. At any rate, after two hours of going in an out of her room, consoling, pleading to go back to sleep, I gave in at about 3:45 a.m. and took her downstairs.

I’d hoped that some TV might relax her back to sleep but nope… it wasn’t until I was vacuuming (yay for white noise!) after lunchtime that she started snoozing on the couch. So yes. I’m tired.

I got lots done this week, though, and it flew by. One of the projects on my list was sketching out my stash-buster blanket idea. Quite a while ago, I was inspired by this gorgeous quilt from Pippa Patchwork that I originally saw on Pinterest:


As I am hardly a quilter, I thought this would be a great solution to my growing stash of odds and ends from various crochet projects. I thought of doing a granny square blanket or a stripey blanket, but this design really “wow’ed” me. Simple enough to work on while watching TV, but I think it has a nice, modern feel.

I whipped out the graph paper to figure out how many squares I’ll need.

stash-buster blanket 2013

And I played around with various colors, picking out 10 that I loved best for the largest squares.

stash-buster blanket 2013

stash-buster blanket 2013

This project is hugely different for me because I don’t think I’ve ever combined so many different colors all at once. I suppose all those years of following Lucy from Attic24 are finally having an effect on me!

So I am slowly (oh, so very slowly) plugging away at my first single-crochet purple square. I need to keep up the momentum 🙂

Well, I think it’s time to get up and bake a dish of brownies for dessert tonight and make my house smell even better than it already does. I’ve got two crock pots going: one simmering a pot of chicken stock, and the other cooking up a delicious pot roast for dinner tonight. Drew and Jake have been at the Eskimo Run for Cub Scouts all day and I know when they get home they’ll be cold and hungry.

Enjoy the rest of your Saturday!

Happy New Year

cookies & cocoa

Well this week has certainly flown by. I didn’t meant to disappear all week, but honestly I just got so caught up in other things that by the time I thought about my blog, I didn’t even feel like booting up the laptop. It was a week of getting back into a schedule, back to school, back to work.

It was also freezing cold this week, which added to my desire to just crawl under blankets in my free time. Yesterday morning around 9:15 I went out briefly, and according to my car’s thermometer, it was 5 chilling degrees outside. The wood stove has been roaring, tea kettle constantly whistling, and comfort food has been on the menu.

In between grocery shopping, taking down and storing Christmas decorations, cleaning, and reorganizing (ah, that bug hits every January — today I completely rearranged my cupboards) I have done a little crochet. Just some simple, colorful washcloths. Poor Noah… his pillow is still unfinished in my bag. But this weekend. I swear this weekend I will finish it up!

The start of a new year just sets my mind on this crazy trajectory of about 8 million different project ideas. I don’t know what it is, but I suddenly have plans for blankets and doll clothes and home decorating projects. I have to constantly whisper to myself, one thing at a time. Still, it’s good to feel inspired. I just need to keep myself in check.

Well, I’m off to enjoy a quiet at-home weekend. No plans, no where to go, and I’m quite happy about it! Hope you all enjoy a relaxing weekend, too!

2012 Crochet in Review

Ah, it’s New Year’s Eve… If you know me at all, you know my great disdain for this faux holiday. I kind of consider it “amateur night” and prefer to stay home. I’ve just never been a fan. Still, it’s kind of natural to reflect on the past year and since I’ve just been reorganizing my yarn stash, I thought it would be fun to do a little crochet retrospective.

I started the year out making baby photo props for a friend of mine. It was exciting and encouraging that someone wanted to purchase my work! No, I wasn’t rushing out pricing car magnet printing for my hats or anything, but it definitely set the tone for the year and kept me motivated. Most of this stuff I blogged about, but some of the projects only made it to my Facebook page. Ready? Here we go!

First up in 2012 were the bunny hat sets. Oh my! While they were adorable I have to admit, the Homespun yarn was a beast to work with. Splitty, prone to fraying, and generally frustrating. I think I made 10 of these in all.

bunny set

Then there was the baby giraffe set I made for a basket my craft group put together for a charity auction. This was such a fun project!

giraffe baby set - front

giraffe baby set - back

I made this blooming flower pillow for Laura’s bed:

flowerpillow1

And these Iron Man fingerless mitts for my husband:

Finished up my husband's Iron Man mitts. He can't wait to wear them to the comic book store :-)

There was the Country Christmas Garland:

Country Christmas Crochet Garland

The owl hat for my niece:

owl hat

A Dr. Who hat for Jake:

photo.JPG

DSC_0397

And a yet-to-be-finished checkerboard pillow for Noah:

photo.JPG

There were other projects along the way that were started and abandoned, or never photographed. In 2013 I want to make sure I document more of my craft projects! And do more craft projects. Honestly, this doesn’t look like so much to me when I put everything up here, LOL… But it was a busy year and I probably thought about crochet a lot more than I got around to working on the projects.

But that’s exactly what I’m going to do tonight. As I said, I’ve been reorganizing my yarn and I’ve collected all my kitchen cotton into a basket and the plan is to start cranking out some new dishcloths tonight. Mine are faded and grubby, so why not start the new year with a pretty new stack?

However you plan to spend the evening, be safe and see ya next year! 😉

Experiments in Millinery

DSC_0245

I know, I know… I’ve already blown the write-every-day-for-a-month thing. Would it excuse me if I told you I was under the weather for two days and then had a totally crazy busy weekend? No? Ah well… I understand 😉 Well, let’s start again, shall we?

My littlest is spending a couple days with Grandma, which has given me time to get a ton done. Yesterday was cleaning/shopping. Today is crafting. Topping the list? A new welding beanie for my dad. Yes, my dad welds. I know, I am lucky to have my own personal welder 🙂

DSC_0242

I have been trying for well over a year to figure out a welding cap pattern that fits him correctly. This really shouldn’t be hard! A while back he gave me an old hat that had been worn through, so I took it apart to see exactly how it was constructed and I made my own pattern from it.

DSC_0243

After a couple cups of coffee, and quite a bit of cursing, I think I got it. Now, let’s just hope it fits!

DSC_0247
Ta-da!

{Tutorial} Country Christmas Crochet Garland

crochetgarland

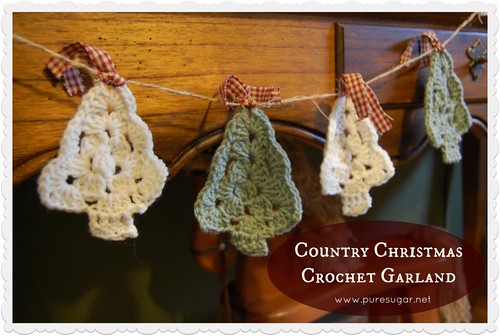
It’s Election Day! I’ll be voting this evening, as my polling location is adjacent to the library and I’m working there for a couple hours tonight. Every year we have an election day raffle to help support our little library, so the hours are extended to correspond with voting hours. This year I decided to whip up this sweet country Christmas garland for the raffle. It’s such a fun project (not to mention instant gratification), that I just had to share it with you!

crochetgarland3

For the garland, you’ll need:

  • about 50″ of jute twine
  • homespun fabric
  • worsted weight yarn (I used acrylic)
  • “H” hook
  • darning needle, scissors

crochetgarland2

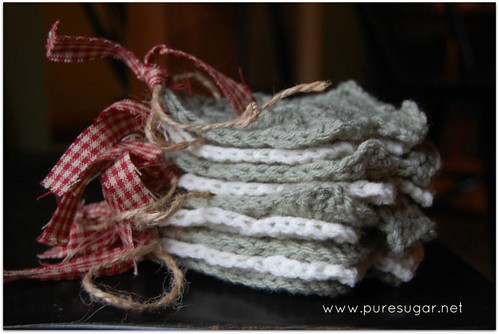
There are a few patterns out there for these granny-style crochet Christmas trees. I tinkered around to come up with a shape I liked, but by all means use your favorite!

Crochet Christmas Tree Motif

Abbreviations:

Ch = chain
SC = single crochet
DC = double crochet
Sl St = slip stitch

Start with a magic circle.

Round 1: Ch 3 (the Ch 3 always counts as the first DC stitch), 3 DC, ch 2, 4 DC, ch 2, 4 DC, ch 2. Slip stitch to the top of the beginning ch 3 st. (Three clusters of 4 DC and three ch 2 spaces.)

Round 2: Sl st over to the first ch 2 space of the previous round. Ch 3. 3 DC, ch 2, 4 DC in this space. *Ch 2, 4 DC, ch 2, 4 DC in next ch 2 space. Repeat from * in the last ch 2 space. Ch 2. Sl st to the top of the beginning ch 3 stitch. (Six clusters of 4 DC and six ch 2 spaces.)

Round 3: Sl st over to the first ch 2 space. Ch 3, 3 DC, ch 3, 4 DC in the space. *Skip three DC of the previous row. SC in the next (fourth) DC (this will be the DC immediately before the ch 2 space). 4 DC in the next space. Skip three DC of the previous row. SC in the next DC. 4 DC, ch 3, 4 DC in the next space. Repeat from * along the second side of the tree. Ch 1. 4 DC in the next ch 2 space. Ch 1. Sl st to the top of beginning ch 3.

Tree Trunk: Turn work. Sl st into first DC.  Ch 3. DC in the next 3 DC stitches. Turn so that the front of the tree is facing you. Ch 2 (counts as the first SC). SC in the next three DC stitches of the previous row and top loop of starting ch. Finish off and weave the yarn end into the back of the tree.

If you don’t want to use a magic circle, you can certainly start with a Ch5, and connect the beginning and end with a slip stitch and then work out of the center of that loop you create. I just think the magic circle makes neater work.

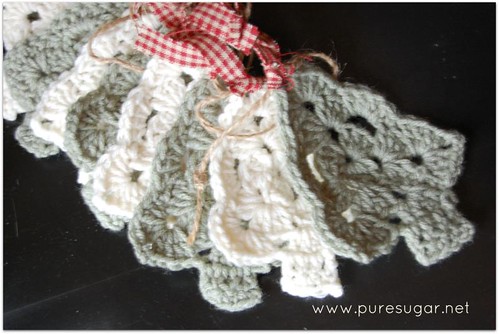
After you accumulate your little stack of trees, it’s time to assemble the garland. You’ll need 9 trees (you could also use 11 if you want them closer — that’s up to you). You’ll need 9 (or 11) 7ish-inches x 1/2 inch pieces of homespun fabric. And you’ll need your jute.

howtocollage

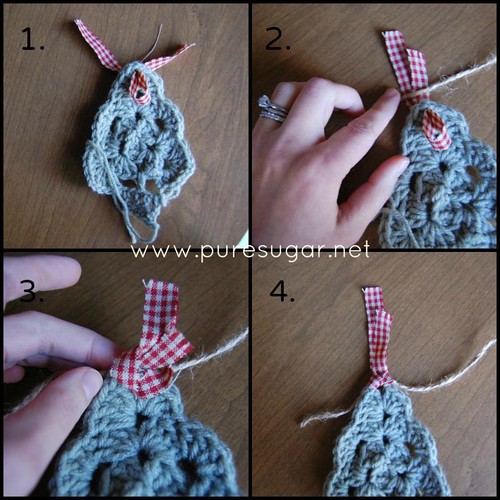
Take a piece of fabric and form a loop. Stick the bottom of the loop through the topmost hole in your tree (1). Lay the jute over the two fabric ends (2). Pull the ends through that loop (3). Then just tighten up the knot until your tree is securely attached to the jute (4).

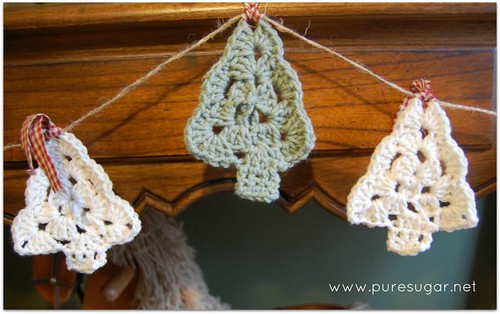
Repeat this for every tree you’ve crocheted.  Then slide the trees around until you have the spacing you want and voila! You have a quick and easy Christmas garland to hang across your mantle, the front of your entertainment center, across a mirror, wherever!

crochetgarland4

If you make this project, be sure to post a link in the comments. I’d love to see your creations!


Linking up with:

Flower Pillow “Ta-Da!”

flowerpillow1

Earlier this summer when Lulu made the transition from her crib to a “big girl” bed, I knew I wanted to make something pretty for it. When my mom was visiting back in June, I started on a blooming flower pillow, using the pattern from Attic24. Only instead of using dozens of colors, I decided to make one enormous white flower.

And enormous it is! It took me forever to finish this, not because the pattern was hard, but I guess I got a little bored with all the white. Nevertheless, I’m happy with the way it came out, and my little girl loves it! The backside is a light green and the side is a dark purple, so everything coordinates with her room.

flowerpillowcollage

Of course, now the boys want pillows, too (only not flower pillows…) Good thing I have a couple of extra cushions laying around. I guess I’ll be added their requests to my never-ending “to crochet” list, LOL!

Tea-Dying and Tote Bag Adorning

DSC_0219

Here’s another craft project I created over the weekend! My mom was visiting (my dad was camping with Drew and the boys at Cub & Partner weekend for Cub Scouts) and I decided to introduce her to the wonder of Hobby Lobby. It’s a good thing the store isn’t that convenient for me to get to, otherwise I’d be in trouble.

We really struck gold with their various clearance sections (and hidden clearance within the aisles). I picked up a black fabric tote for under $3 and a package of 5 doilies for around $3 and immediately had an idea of how I wanted to adorn it. Originally I thought of placing a doily in the corner and spraying bleach. But that was going to be messier than I wanted. Next best thing? Dye the doily to get the antique color I wanted and then just stick it on the bag.

Here’s a quick pic of the doilies before I dyed them:

DSC_0208
First, I dunked the doily in tea and let it sit for a few minutes before hanging it up to dry.

DSC_0209

DSC_0210

Can you tell that they now look a little aged? Then I gathered my supplies (LOL… told you this was easy).

DSC_0216

And then I just carefully dotted fabric glue along the back of the doily and then placed in where I wanted it.

DSC_0218

And now I have a roomy black tote bag with a little bit of style! I think that between trips to the lake and the park it’ll see a lot of use this summer.

Ridiculously Easy Initial Wreath

DSC_0212

I have been getting quite a bit of crafting done lately, which has been awesome! It’s a combination of finding just the right items at just the right price, and the fact that Laura is starting to play a little more independently, allowing me bits of time to play 🙂 Last weekend I completed a project I’ve been wanting to do for a long time: make a new wreath for our front door.

I wish we could have a really cool painted front door, but our house is mahogany and stained a reddish-brown. Honestly, there aren’t a lot of colors besides white or cream that look good with it, so it definitely needs a bit of adornment. When I found a big “B” on clearance at Michael’s, I was totally inspired! Then, when I was at Hobby Lobby and I found burlap ribbon, my life was made much easier.

Basically, I took a straw wreath and wrapped it with the burlap ribbon, securing the back with floral greening pins (like these). I carefully positioned my letter so that I could feed ribbon through the top, allowing me to change it with the seasons. Then I hot-glued the letter to the wreath, arranged my silk flowers (hot-glueing when necessary and hoping it will peel off easily when I decide to change up the wreath), and fed the ribbon between the wreath form and the “B” to create the hanger.

And voila! A new wreath that I made in less than an hour (complete with interruptions). The real genius of this wreath, though, is how it is hung. My mom gets all the credit for this idea. Basically, I created a loop at the top of the ribbon (yep, again with my hot glue), and cut a slit for the wreath hanger to slide into. Here are a couple pictures — hopefully they make it clearer.

DSC_0222

DSC_0220

DSC_0223

This way, the ribbons doesn’t get all twisted and you can use one of those inexpensive wreath hangers from the dollar store. So far it’s holding up great! I am sure you could sew the ribbon in addition to glueing it to make it extra secure.

Anyway, I am really happy with the way it turned out and now my front door is a little more welcoming.

Super Simple Teacher (and Bus Driver!) Gifts

DSC_0180

The end of the school year is upon us! Yes, I realize that much of the country has been out of school for quite a while, but here in the Northeast, many schools still start in September and go until the end of June. I wanted to put together a few thank-you gifts for the teachers and our bus driver, but since (as usual) I don’t plan until the last minute, I came up with a few very simple tokens of appreciation.

According to Jake, his teacher really loves chocolate, so I packaged some super-indulgent chocolate-drizzled chocolate biscotti into a Ball jar and tied it all up with a tag that reads, “Thanks for making me one smart cookie.”

DSC_0185

Noah’s teacher loves her coffee. In fact, she sings songs about coffee to her class! Even though we’ve already chipped in to the class gift (she’s retiring this year), I wanted Noah to give her a little something to show our appreciation. So I packaged up a bag of coffee and a biscotti for her. The tag reads (the completely unoriginal, but that’s okay) “Thanks a latté for being a great teacher!”
DSC_0188

And last, but certainly not least, I wanted to thank our kids’ bus driver who is just the best! Again, I didn’t want to go crazy — just to thank him for getting Jake & Noah from here to there. He’s getting a big back of Reese’s Pieces and the tag reads, “We are thrilled to pieces that you are our bus driver. Thanks for keeping us safe!”

DSC_0187

I am sure my husband will groan when he reads my puns, but hey — that’s just the kind of gal I am 🙂 Anyway… I’m going to have the boys also write notes to their teachers to round out the gifts. Just a couple more days to go!