CSA 2012 | Share #6

DSC_0476

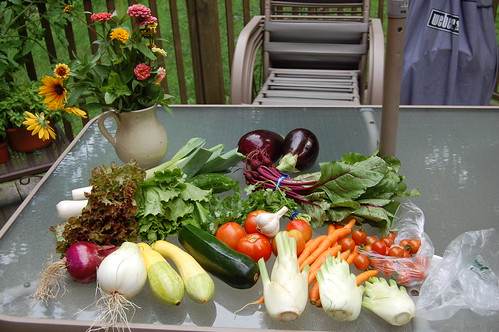
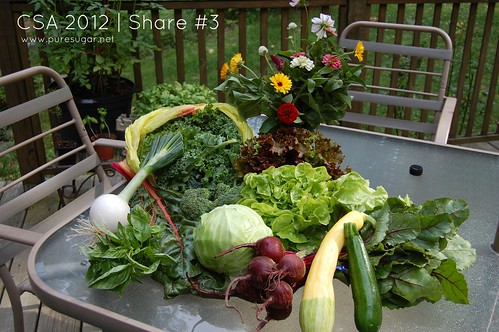
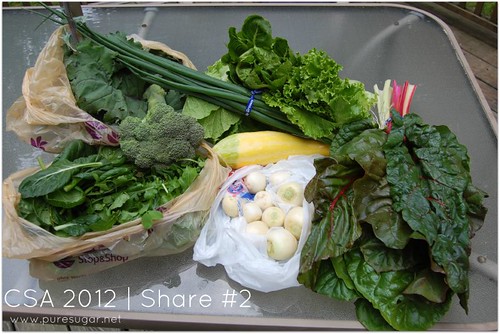
Mid-August. Here we go! Another huge share this week — the kind of share that makes me glad we opt for a bi-weekly option. Although we really do eat a lot of vegetables, it would be tough to consume all of this every week! Let’s take a look, shall we?

  • 7 lbs. of tomatoes
  • 1 head of garlic
  • parsley & lemon basil
  • an enormous zucchini
  • carrots
  • beets
  • scallions (2 big bunches)
  • kale (other option: swiss chard)
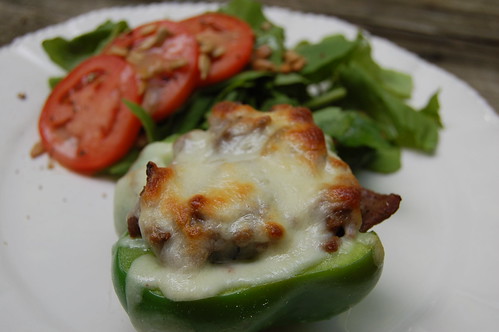
  • 2 peppers (other option: 2 leek and 1 eggplant — this one was a tough call)
  • 2 heads of lettuce
  • 3 cucumbers
  • 3 onions
  • 1 cantaloupe
  • green beans
  • PYO cherry tomatoes (also tomatillos, but I skipped them this week)
  • PYO flowers

As I write this up, I cooling down some salsa. I had a package of the Ball Fiesta Salsa Mix, which people generally seem to like, so I’m giving that a try because it’s quick and easy. We eat so much salsa in this house that it’ll just go right in the fridge (if there’s any left after my taste-testers get a hold of it). With the rest I might make some roasted tomato soup. We’ll see.

The cherry tomatoes are all but gone. The kids have been nibbling on them like crazy (even Laura who never was a tomato eater until we picked them off our own plant on the deck). I’ve successfully pawned off my beets to a friend. And everything else is pretty straightforward – salad stuff, easy dinner sides… It’s been kind of a crazy week (and the busy-ness continues through next Monday) so I’m not sure if I’m up for trying anything new.

{Recipe} A Yankee’s Version of Pimento Cheese

Pimento Cheese

I’m a New England gal. OK, yes I’ve lived in New York for the last 12 years and that’s not technically New England, but it’s close enough in my book. My point is, I am ignorant about all things Southern. I revel in my Northern-ness (much as southern gals are proud of their own heritage). But that doesn’t mean I can’t appreciate a tasty Southern treat (or all of them!). So when my friend Stef at Down the Primrose Path started talking about something called “pimento cheese” I was intrigued.

I, lover of all things cheese, had never heard of this. Pimento loaf? Yuck, but yes. Pimento-stuffed olives? Of course — I eat them all the time. But not pimento cheese. (Unless you count the cream cheese/green stuffed olive mixture I use to stuff celery on Thanksgiving.)

Then, one night I was flipping through an issue of Rachel Ray’s magazine and there it was: a recipe! Of course, I trust my Southern friends a little more than RR, so I took tips from Stefani and whipped up a pot the other night. When I took the ingredients out the fridge and looked at them all together, I questioned myself a bit but continued with the recipe anyway. And when I tried it… well, I was hooked! I think I scarfed down about half the batch that afternoon.

From what I understand of pimento cheese, everyone makes it a little bit different, but the three primary components are cheddar, pimentos, and mayo. In every article I’ve read, a brand called “Duke’s” is preferred, but I’ve never heard of or seen that up here so I went with good old Hellman’s. As I mentioned, my version was thrown together with tips from a friend, so feel free to change things around, use different cheese, whatever! And if you have a favorite pimento cheese recipe, please share it with me!

A Yankee’s Version of Pimento Cheese

Pimento Cheese

4 oz. Pepper Jack Cheese, shredded
4 oz. Sharp Cheddar Cheese, shredded
3 heaping Tbsp. chopped pimentos
Mayonnaise – just enough to mix it all together
Salt & pepper to taste

Combine first three ingredients in a bowl. Mix in a small amount of mayonnaise. Add more mayo, just a little at a time, until the mixture comes to your preferred consistency. (I like mine less mayo-y and a little more thick). Season with salt & pepper to taste.

Traditionally, pimento cheese is served as a sandwich on white bread with the crusts cut off (at least according to this NPR story). But I really liked eating them on Oopsie Rolls – my favorite low-carb “bread.” I definitely see this recipe become a kitchen staple. It’s the perfect little extra yummy bite to have with soup or a salad!

I’m linking up with Sandra at Diary of a SAHM
because it’s Cooking Thursday!
Photobucket

CSA 2012 | Share #5

csa

It’s August! Can you believe it? Time for back to school organization, getting back into routines, all that kind of stuff. This time of year always makes me think of going back to school. Maybe someday I’ll actually look into it, but for now I’m consumed with 2nd and 5th grade supply lists. This time of year also means a more varied harvest each week and you can certainly see that in this week’s farm share!

This, to me, was a very exciting week! Check it out:

  • 2 heads of lettuce
  • 2 eggplant
  • 2 leeks
  • 3 fennel bulbs (you could have also chosen chard or kale, but I love me some fennel)
  • 1 head of garlic
  • yellow squash and zucchini
  • 2 onions (I snagged the last sweet onion, heh!)
  • cilantro
  • cucumber (or green pepper, but I went for the cuke)
  • carrots
  • tomatoes (including PYO cherry tomatoes
  • baby beets
  • PYO flowers

Things I plan on making: bharta (my favorite and only use for the eggplant) and potato soup with leek and fennel. (Oh, the fennel gives such a nice flavor… I’m going to stock it in thte freezer to enjoy this fall).

Summer is speeding right along and as usual, I am reminded of this each time I pick up my veggies.

CSA 2012 | Share #4

DSC_0344

Again, I’m late with my farm share post. This was last week’s yield. It was hot and humid and I was sweaty as heck and I had to drag Jake and Noah with me after camp, but heading to the farm was actually a nice transition between our very active day and our lazy night. I had the timing just-right and the barn wasn’t crammed with people!

We got:

  • 2 heads of lettuce
  • 1 zucchini
  • 1 yellow squash
  • 1 sweet onion (alternate choice: leeks — it was a hard decision)
  • a head of cabbage
  • a bunch of carrots
  • 1.5 lbs. of green beans
  • 2 cucumbers
  • a bunch of lemon basil
  • head of garlic
  • PYO cherry tomatoes and tomatillos

We also picked flowers! The boys loved that. And it’s no secret that I do too 🙂

DSC_0345

Unfortunately, the carrots got rubbery pretty fast, so I just stuck them in the freezer to use for chicken stock. It was a bummer, but… having them frozen will come in handy.

Menu Plan Monday, Lazy Summer Days

Oh, I cannot begin to tell you how glad I am to be done with summer camps. The boys had a blast and I’m so glad I got to volunteer (unplanned) at Cub Scout Day Camp, but those long days in the sun really wear you out. We have a pretty low-key week ahead, thank goodness! I’m heading out to dinner with a girlfriend on Wednesday night, and Saturday will be something easy because I’m going to see one of my Top 5 Favorite Authors read at a local bookstore. (So super excited about this!!!)

I also hope to stop neglecting my blog. I have to get up last week’s CSA post, still! Anyway, I’m enjoying the lack of having to be somewhere, and soon I need to get organized for the boys’ birthdays and then finally it will be back to school. Seems like a way’s away, but Labor Day will be here soon enough! August always seems to fly.

Enough of a tangent. Here’s what I’m thinking about cooking this week:

  • Sunday: Baked chicken with BBQ sauce, green beans, baked potatoes
  • Monday: Sausage & peppers, salad
  • Tuesday: Take-out
  • Wednesday: Chicken tenders or something easy (I get to eat out!)
  • Thursday: Chicken-tomatillo soup (slow cooker), salad or quesadilla
  • Friday: Burgers, salad
  • Saturday: ???

For more menu ideas, visit Organizing Junkie’s Menu Plan Monday feature.

Craving…

chocolate covered strawberries

I am totally craving sweets today. Remember these? Yeah, those are the chocolate-covered strawberries I got for Mother’s Day. Of course I could get some at Shari’s Berries , but that will not be fast enough. And naturally I’m out of strawberries! Sigh… I’ll have to make due with something else later on. I could dip into my emergency chocolate stash, or maybe have a small dish of ice cream with a bit of chocolate sauce. Or maybe after I eat dinner the craving will go away entirely.

But I doubt it, LOL!

{CSA 2012} Share #3

CSA 2012 | Share #3

Hoo boy, this post is going up late! Yes, this is Tuesday’s farm share. I just haven’t had the chance to get much blogging done this week. But better late than never, right?

Lots of good things this week, especially the PYO flowers! 20 stems! Laura had a great time picking them out with me. We also got:

  • 3 heads of lettuce
  • kale  & chard
  • 1 bunch of beets
  • 1 sweet onion (My favorite! I just love these so much!)
  • 1 head of cabbage
  • 1 decent-sized bunch of basil
  • 1/2 lb. of broccoli
  • zucchini & summer squash

The chard wilted before I had a chance to use it, but… that’s how it goes with chard. I feel like you have to use it as soon as it’s picked or else it just gets icky. We grilled the zucchini and summer squash on the 4th of July and they were fantastic! I didn’t do anything special: just salt, pepper, and olive oil in a foil packet. Delicious, though.

The beets…. ah, beets. If you’ve read my blog for any length of time you know that beets are my culinary nemesis. I know they’re super healthy, and I think they’re a very pretty vegetable, but I have a hard time getting past the fact that (to my palate) they taste like dirt. Last year I pickled them and that was OK. Back in 2008 I made this beet cake and that was actually really delicious. I’ve tried boiling, roasting and I choke them down, but beets are just not my favorite thing.

Still, I press on. So for last night’s dinner I decided to try them raw. I peeled a large beet and then shredded it in the food processor along with a carrot, a granny smith apple, and some fresh ginger. I tossed the slaw with some champagne vinaigrette and you know what? It was delicious! It’s a magic combination of ingredients that accentuates the beet’s natural sweetness without the earthiness that I don’t like. So that was a win. What to do with the rest of them now? I’ll make the slaw again, but I might resort to roasting.  A friend suggested sprinkling with dill, so I may give that a shot.

Anyway, that’s it for my week in vegetables 🙂

{Recipe} Blueberry Lime Jam

blueberry lime jam

Well, I haven’t just been crafting. I’ve been busy in the kitchen too. When blueberries were on sale last week at Shop Rite, I jumped on the sale in order to make my favorite spread (coincidentally the very first thing I ever made when I learned to can): blueberry-lime jam. Everyone is always all about the strawberries, it seems, but I will bide my time and wait for summer blueberries and can my butt of even if it’s 92 degrees outside (which it happened to be).

As with any and all things canning, in the interest of food safety it’s important to follow trusted recipes. Canning is more of a science, really. And if you don’t get things just right you can end up with a nasty case of botulism. But don’t let that scare you off, because really — if you can follow some directions and boil water, then you can totally do this. And it will be better than anything you buy in a store!

This recipe is based on one from the Ball Blue Book. I used no-sugar pectin so I could reduce the amount of sugar I used in the recipe (otherwise I find the sweetness cloying). Also, I always use bottled lime juice because the acidity is consistent. There is lots of back and forth on whether to use fresh or bottled, but for something like this, I find that using the store-bought juice is easier and I know it’s high enough in acid.

Blueberry-Lime Jam

blueberry-lime jam

4 1/2 cups blueberries
1 package dry no-sugar-needed pectin
3 cups granulated sugar
1 tablespoon lime zest
1/3 cup bottled lime juice

Crush the blueberries one layer at a time. (Do not wimp out and use a food processor — use a fork or a potato masher. It’s therapeutic and you want those little bits of blueberry in there. Save the processing for blueberry butter.)Next, combine the crushed blueberries and pectin in a large saucepot. Bring it to a boil, being sure to stir frequently. Then add your sugar, stirring until it is all dissolved. Stir in the lime zest and lime juice and return the jam to a rolling boil. Boil hard (no little bubbles — wait for the serious bubbles) for 1 minute, stirring constantly.

Remove the pot from the heat and skim off any foam if you have it. Ladle the hot jam into hot jars, leaving 1/4-inch headspace. Adjust two-piece caps and process for 15 minutes in a boiling water canner. (You might have to boil longer if you live in a high altitude. Consult a canning guide (such as Ball Canning) for correct times.

If you don’t have canning equipment, you can also store this in your fridge, though I’d try to use it up within a few weeks if you skip the processing step.

Yield: about 5 half-pints.

Note: Take it from me and don’t boil it longer than the 1 minute called for in the recipe because it will affect the consistency of your jam. It will taste fine, but it will be a little more goopy. If you’re just making it for your own use, that’s no big deal, but if you are giving it is gifts, you probably want it more aesthetically pleasing.

There’s still lots of time for blueberries (at least here in the Northeast), so if you get your hands on some at a good price, try out this recipe!

Linking up with: Cooking Thursday with Sandra at Diary of a SAHM.

{CSA 2012} Share #2

CSA 2012 | Share #2

Yesterday was our second farm share pickup of the season. While there are still lots of greens, that lone summer squash has me hopeful that by our next share, we’ll have more of what I call “exciting” vegetables.

Let’s see what we have here…

  • 2 heads of lettuce
  • 1 head of Chinese cabbage
  • kale
  • arugula and tat soi
  • Swiss chard
  • scallions
  • yellow summer squash
  • hakuri turnips
  • broccoli

I skipped the bok choi and the garlic scapes (go ahead and slap me for it — I know, I know… I’m just not into them this year for some reason). Last night for dinner I roasted the broccoli and sauteed half of the chard. There isn’t too much to experiment with here. I wanted to make some zuppa toscana with the kale, but considering the next few days are going to be in the 90s, well… I’m not sure that’s an ace idea!

I might try making this Tuscan Kale Salad with Roasted Chickpeas. Kale is one of those goitrogenic veggies that people with thyroid problems really shouldn’t eat raw. (It interferes with thyroid function.) But since I don’t eat a ton of raw kale, it really shouldn’t be a problem. It’s all about balance, right? Anyway, I’ll let you know what I end up doing with it.

At least we should be good for salads for a while! 🙂

{Recipe} Cheesesteak Stuffed Peppers

cheesesteak stuffed peppers

I’ll be honest with you: I’ve never been a fan of stuffed peppers. I hate mushy peppers and when you bake them, that texture seems inevitable. But then I saw a recipe for Philly Cheesesteak Stuffed Peppers from Peace, Love, and Low Carb. They looked so good, that I knew I had to try them.

Originally I was going to make these for dinner tonight, but then I realized that the boys would probably complain and since I’m not feeling great today, I just didn’t want to deal with that. And it’s just as well because I only had enough steak for two servings — me and Drew!

I did make several changes to the original recipe. But since I didn’t measure anything (I rarely do!), I can only give you a basic idea of what I did.

First, I melted butter (I used clarified butter for no real reason other than that’s what I grabbed out of the fridge). Then, I sauteed a bunch of sliced onions with salt and pepper until the got soft.

Next I added thinly sliced steak. I used beef tenderloin. (Grass-fed beef tenderloin is on sale at Shop Rite this week, so I was all over that — I cut it into steaks and used the small end to make this dish.) I seasoned it with a little more salt and pepper and a few dashes of Worcestershire sauce. While the steak cooked I cut a green bell pepper in half and removed the seeds.

I put some shredded Italian cheese blend on the bottom of each pepper half, then divided the cooked steak and onion mixture between the pepper and then topped it with more shredded cheese.

I baked the peppers at 400 degrees until the cheese was all melty and delicious-looking. I think it took about 15 minutes (really, I wasn’t paying attention).

Then I served those babies up with an arugula, tomato, and sunflower seed salad with My Friend Michelle’s Vinaigrette.

DSC_0150

Then the real test: would Drew like it? And yes. Yes, he did. He requested I make it again, even 🙂

These were so much more fun to eat than many of the other low-carb cheesesteak recipes where you basically throw all the ingredients in a bowl. The peppers retained a crispness and the cheese was gooey and the steak was delicious (of course — it’s steak!).

Be sure to check out the original recipe for exact measurements if you don’t want to fly by the seat of your pants like me 🙂