{Recipe} Hearty Crock Pot Split Pea Soup

Hearty Crock Pot Split Pea Soup

The holidays are over, but maybe you still have some leftover ham? Or maybe you’re just craving a stick-to-your-ribs soup on a chilly winter day. There’s nothing like a hearty bowl of split pea soup. Over the years, I’ve tried several different recipes, but none of them seemed like “the one.” They were too smoky, or too salty, or just had the wrong flavor.

Desperate to satisfy a craving, I gave one more recipe a shot, adapting it a little bit, and I finally came up with a winner. When your husband exclaims, “This soup is awesome!” and your 6-year-old asks to take to school for lunch the next day, well… you know it’s got to be pretty good.

Hearty Crock Pot Split Pea Soup

1 1/4 cup of dried split peas, picked over and rinsed
4 cups water
2 chicken boullion cubes
1 large carrot, peeled and diced
2 celery ribs, sliced
1/2 medium onion, diced
1 medium potato, peeled and diced
1/2 – 1 lb. of ham, diced
1 bay leaf

Combine all ingredients in a slow cooker and cook on low for 4-6 hours. Check on the soup about halfway through. Add more liquid if necessary. Prior to serving, use a potato masher to mash ingredients slightly and thicken the soup.

Hearty Crock Pot Split Pea Soup

This recipe can easily be doubled, and next time I may have to do that. Top the soup with oyster cracker or croutons, or serve with a buttered roll.

{Recipe} Black Currant Tea Vodka Cordial

Black Currant Tea Vodka

If you are looking for an easy, last-minute gift or something interesting to bring to a holiday party, have I got the recipe for you! A while back I tried a fig tea vodka my friend brewed. It was delicious and I put the idea on my long to-try list. Last month I gave it a shot, and the results were fantastic.

First, let me give you the recipe.

Black Currant Tea Vodka Cordial

12 oz. of vodka
1 silk sachet of Harney & Sons Black Currant tea
1 oz. (or more to taste) simple syrup

Pour the vodka in a mason jar and add the sachet. Cover and allow to steep for 8-10 hours. Remove sachet and dispose. Add simple syrup to your desired sweetness. Store in a cool, dry place (I prefer the freezer).

Black Currant Tea Vodka

First, a note on the vodka…

While you don’t have to use your Stoli or Grey Goose for this recipe, I would not recommend anything too harsh. Sobieski is my go-to vodka. First, because it’s Polish, and second because I think it’s good quality for a reasonable price.

Second, notes on the tea…

I think it’s really important to use a high-quality tea when making this flavored vodka. You will definitely notice a difference between a cordial made with good ingredients vs. one made with cheap ingredients. That being said, Harney is one of my favorites and I don’t think their prices are crazy. Are they a little pricer than some of the grocery store brands? Yes, but trust me — it’s so worth it. And you don’t have to mail-order them anymore. I’ve seen the sachets at Target and Stop & Shop. That brings us to why I prefer using the tea sachet. I find that the sachet allows you to brew more than just a single cup, so it’s perfect for a “pint-ish” of vodka. I’ve also used the sachet with 8 oz. of vodka and it worked fine, too. I’ve never tried this with loose tea, though I’m sure you could do it. You’ll just have to strain everything out.

Feel free to experiment with other flavors of tea, too. I’ve also made tea infused vodka using Hot Cinnamon Spice and that was really yummy.

Na Zdrowie!

Creamy Crab Rangoon Dip with Wonton Chips

Creamy Crab Rangoon Dip

My two favorite treats when we order Chinese food are hot & sour soup and crab rangoons. A couple years ago I created a hot & sour soup recipe that I am quite happy with. (It’s on my old blog — I’ll have to move that post over here!). But crab rangoons always seemed like they’d be fussy (and fried — and I don’t really like to deep fry food in my kitchen). After browsing several recipes for crab dip, I cobbled together a recipe for crab rangoon dip! It is so easy to put together and was a big hit when I brought it to a girls’ night out dinner (my friends are the best recipe testers).

Creamy Crab Rangoon Dip

Last night I made it again, just to make sure I had everything right (not because I wanted to lick the bowl or anything, LOL!). My family also raved about it, including my picky son who remarked, “Actually, it’s not bad!” Trust me — that was a compliment. This is a dip that I think will go into frequent rotation around here!

Creamy Crab Rangoon Dip with Wonton Chips
An easy, cheesy, yummy dip. Perfect when you have a craving for those delicious crab rangoons from your favorite Chinese restaurant!
Write a review
Print
Ingredients
  1. 6-oz. can of crabmeat
  2. 4 oz. softened cream cheese.
  3. 1/3 c. mayonnaise
  4. 1/2 tsp. Worstershire sauce
  5. 1/2 tsp. Tabasco sauce
  6. 1/2 tsp. lemon juice
  7. 3-4 scallions, chopped
  8. 1/2 c. shredded mozzarella cheese
  9. won ton wrappers
Instructions
  1. Preheat oven to 350 degrees.
  2. TO MAKE THE WONTON CHIPS: Take a stack of wonton wrappers and cut on a diagonal so you have piles of triangles. Arrange in a single layer on a cookie sheet and bake for about 5 minutes -- just until the wontons are crispy.
  3. Using a fork or a hand mixer, combine the crabmeat, cream cheese, mayo, Worsterhire sauce, Tabasco sauce, and lemon juice in a medium bowl. Stir until the ingredients are well combined. Add the scallions and mozzeralla cheese and stir to incorporate into the mixture.
  4. Transfer dip to a shallow, oven-safe dish and bake uncovered for approx. 20 minutes until the dip is hot and bubbly.
  5. Garnish the dip with additional scallions if desired. Serve with wonton chips for dipping.
Notes
  1. Ovens vary, so be sure to keep an eye on the wonton chips to avoid burning them.
  2. To create an elegant appetizer, line mini muffin tins with the uncooked wontons, then fill with the dip. Bake for approx. 10 minutes or until dip is bubbly and wonton edges are crisp.
  3. No wontons? No problem! Simply substitute tortilla chips.
Pure Sugar https://www.puresugar.net/
BlogSig

Cretons (French-Canadian Pork Pate)

Cretons (French-Canadian Pork Pate)Many years ago, when my husband’s French-Canadian grandmother was still alive, I remember my mother-in-law serving something called cretons at the holidays. Initially, I was put off by this strange pork pate. It was eaten cold, either on crackers or toast, and contained what I (at that time) considered “sweet” spices. I couldn’t wrap my head around how it all worked together.

Flash forward a few years. My husband and our two boys went on a vacation to Quebec while I stayed home with our teeny baby. The hotel served cretons as part of their traditional breakfast and D. fell in love with it all over again. I decided I was going to try making a version.

Over the years I’ve tweaked a bit here and a bit there, and today I’m sharing the version I make. It is authentic? I can’t say — I’ve never tried the real thing! D. assures me, however, that it is pretty darn close. My favorite way to enjoy cretons is spread on top of a buttered, toasted English muffin. Toast will do nicely, too. But you need to have the butter — it just adds a little extra something. So please, just take it from me and try this! I think you’ll agree that it’s a delicious treat.

Cretons (French-Canadian Pork Pate)

Cretons

1 lb. ground pork
1 med. onion, finely chopped
1-2 cloves garlic, minced
1/2 tsp. salt
3/4 tsp. ground black pepper
1/4 tsp. ground cloves
1/4 tsp. ground cinnamon
1/4 tsp. ground ginger
1/4 tsp. nutmeg
3/4 cup milk
1/4 cup plain breadcrumbs

Brown pork in a large pan along with the chopped onions and garlic. Add the salt, pepper, cloves, cinnamon, ginger, and nutmeg. Stir to combine and cook for 1 minute. Transfer pork mixture to a food processor and pulse until the meat reaches an extremely fine consistency.
Return the pork mixture to the pan and add the milk and bread crumbs and cook for 3 minutes over medium heat. Stir well to blend everything together. Reduce the heat to LOW, cover, and cook, stirring occasionally, until the pork is very tender and most of the liquid is evaporated, about 30-40 min. Remove the lid and cook uncovered, stirring occasionally, until the mixture is thick and all the liquid is evaporated. Remove from the heat and adjust the seasoning, to taste.
Transfer to a bowl and smooth the top with a spatula or the back of a spoon. Cover tightly with plastic wrap or a lid and refrigerate until well chilled and firm, at least 4 hours or overnight.

Adventures in Fermentation – Pickles

Polish Dill Pickles

There’s nothing like a good pickle. Am I right? A crunchy, tangy, sour pickle is the perfect companion to a lunchtime sandwich. I’ve made various types of pickles before — the quick-pickled “overnight” pickles and vinegar-brined pickles that were then canned for storage. But despite all of my attempts, none ever seemed to compare to the delicious Polish dill pickles my Babci used to make.

Ogórki kiszone (oh-GOORR-kee keeSHOH-neh) was a summertime staple in our house. My uncle had a huge garden and every summer my grandmother would make jars of garlicky pickles from the buckets of cucumbers that were harvested.  The kiszone recipe was simple: cucumbers, dill, garlic, salt, and water. You add everything to a jar, let it sit on the counter, and after a while you magically had delicious pickles!

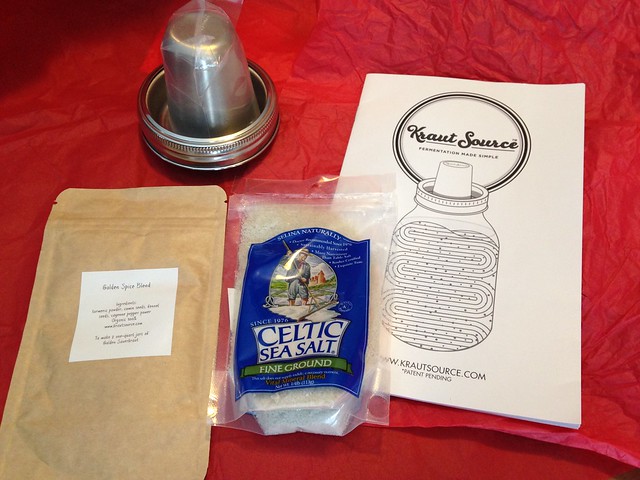
Back then I didn’t realize what the magic was, but I now know that it’s simply fermentation. So when my husband gave me a Kraut Source gadget for Valentine’s day, I knew that this summer I’d be making my own version of Babci’s pickles.

Kraut Source

A couple weeks ago I finally decided to give it a shot. The batch took all of 10 minutes to put together, and the Kraut Source airlock lid was really easy to use. Could this possibly taste good? It’s way too easy, I thought. But I figured it was worth trying.

Polish Dill Pickles

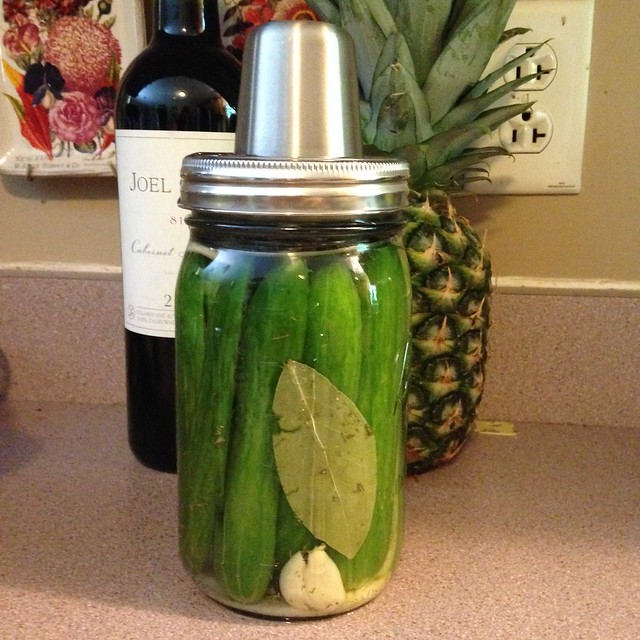
I set the jar on the counter and went about my business. A few days later, I checked on the pickles and started to worry. I had a few concerns.

  1. My fermented pickle brine looks cloudy. Is this normal? Is it supposed to look like that?
    — After a little research I learned that the answer is YES! A cloudy brine is normal and is to be expected. It’s due to the growth of lactic acid bacteria and it’s a sign that fermentation is occurring.
  2. There are white flakes or white specks at the bottom of my jar of fermented pickles. What is it? Are they still safe to eat?
    — I was reassured to learn that the white bits are again, due to the lactic acid bacteria. Nothing needs to be done.

Whew! It was all going to be OK.

A week after I started the process, I decided to crack open the jar and have a family taste test. You understand, I live with some of the world’s most discriminating pickle connesiours. So you can only imagine my excitement when my husband and all three kids started fighting over pickle pieces and declared them “AMAZING!!!”

Hot damn, it worked! I’m not going to say that they were as good as my Babci’s, but they were definitely close.

Polish Dill Pickles

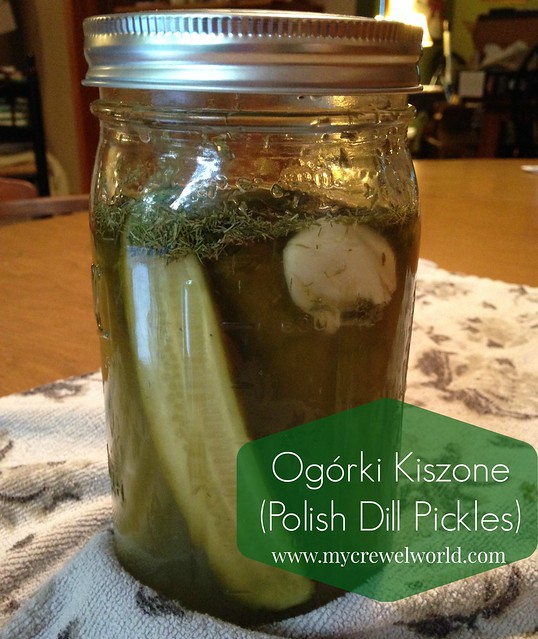
Ogórki Kiszone (Polish Garlic Dill Pickles)
6-8 pickling cucumbers, washed and dried
4 cloves peeled, smashed garlic
1 stem dill with seeds (or 2 Tbsp. dried dill weed)
1 bay leaf
2-3 Tbsp. kosher salt, sea salt, or pickling salt (do not use table salt)
2 cups water

      Bring 2 cups of filtered water to a boil. Pour into a bowl and dissolve the salt. Allow the brine to cool completely.


      Trim the blossom ends off the cucumbers. (This helps them stay crunchy). You may leave the stem end on, if you like.


      Add the garlic, bay leaf, and dill to the bottom of a wide-mouthed quart-sized canning jar. Pack in the cucumbers.


      Cover the pickles with the cooled salt brine until it reaches about 1” above the shoulder of the mason jar. It is important that every bit of vegetable is covered with water, so trim the cukes down if necessary.


      If you have a KrautSource, follow the directions to secure it on the lid. If you don’t have the gadget, no problem. Loosely (may I stress loosely?) close the jar with a sterilized cap. Do not secure it tightly – the carbon dioxide that is produced during fermentation needs to escape.


    Store the jar out of direct heat (on the countertop should be fine) and check on your pickles every few days to make sure they’re still covered with water. After 7 days, your pickles should be ready to eat.

I can’t wait to experiment further with fermented pickles! For my first batch I used dried dill, but I know the flavor would be a lot better with fresh dill, so my next batch will definitely include it.

{Recipe} Marinated Butter Beans for your Antipasto Platter

Marinated butter beans

When we have parties, my favorite appetizer to prepare is an antipasto platter — delicious savory treats, piled high on a platter, and shared family style. Add some crostini or baguette to soak up the vinegar and oil from the various foods and you’ve got a treat that will please everyone. The time may be over for summer BBQs, but as the holidays approach, so will entertaining opportunities!

My typical antipasto platter includes cured meat (usually pepperoni or salami), fresh mozzarella, olives, roasted red peppers, maybe some artichokes or pickled asparagus… really, whatever I have on hand. Last month I got the idea of using beans on the antipasto tray I prepared for the boys’ birthday party. Not sure how or why that popped into my head (possibly they were talking about a bean salad on an NPR program about picnic foods that I was listening to as I drove). I threw this recipe together for Marinated Butter Beans and they were a huge hit! Not only were they delicious on their own, but they added zing to a tossed salad and bulked up a pasta salad, too. You may have seen marinated butter beans at the deli case or in the “olive bar” area of your grocery store, but why pay those prices when you can make it yourself for a whole lot less? 

Marinated Butter Beans
A tasty addition to your antipasto tray
Write a review
Print
Ingredients
  1. 1 15-oz. can of butter beans
  2. 1/4 c. olive oil
  3. 3 Tbsp. red wine vinegar
  4. 1 tsp. capers
  5. 1 Tbsp. minced onion (not dried)
  6. 1 tsp. diced red pepper
  7. 1/2 tsp. Italian seasoning
  8. pinch of salt
Instructions
  1. In the bottom of a mason jar or a bowl, combine olive oil, vinegar, capers, onion, red pepper, Italian seasoning, and salt. Drain butter beans and rinse well. Add beans to the jar and stir to coat. Refrigerate the beans for at least a few hours, or better yet, overnight.
Notes
  1. Add to your antipasto platter, salad, or just enjoy as a snack.
Pure Sugar https://www.puresugar.net/

For more yummy recipes, head over to Diary of a Stay at Home Mom for Cooking Thursday!

{Recipe} Indian-Spiced Chicken Burgers with Cumin-Yogurt Sauce

Indian Spiced Chicken Burgers

The summer is winding down, but there is still plenty of time to grill up a great burger! While I love a big, meaty cheeseburger, sometimes it’s fun to change things up a bit. Today I’m sharing with you a recipe for chicken burgers with an Indian twist. Don’t skip making the Cumin-Yogurt sauce — it’s what really makes the burgers stand out!

Indian Spiced Chicken Burgers with Cumin-Yogurt Sauce
A delicious alternative to traditional burgers
Write a review
Print
Burgers
  1. 1 package of ground chicken breast (approx. 1 lb.)
  2. 4 scallions, thinly sliced
  3. 2 jalapenos, seeded and diced
  4. 2-inch piece of fresh ginger, peeled and grated
  5. 2 Tbsp. freshly squeezed lemon juice (from 1 lemon)
  6. 1/2 tsp. red chili powder
  7. 1/2 tsp. ground cumin
  8. 1/4 tsp. ground turmeric
  9. 1 Tbsp. ground coriander
  10. salt and pepper
  11. mini pitas
  12. chopped onions and tomato
Cumin-yogurt sauce
  1. 1/2 cup plain low-fat yogurt
  2. 1/2 tsp. ground cumin
  3. handful of chopped cilantro
  4. salt and pepper
Instructions
  1. Prepare the cumin-yogurt sauce first by combining the yogurt, cumin, and cilantro in a bowl. Add salt and pepper to taste. Set aside to allow the flavors to intensify.
For the chicken burgers
  1. Combine the ground chicken, scallions, jalapenos, ginger, lemon juice, chili powder, cumin, turmeric, coriander, salt, and pepper in a medium bowl. Stir everything together really well then let the mixture sit for about 10 minutes.
  2. Gently form burger patties. I made mine more oblong in shape to better fit inside the pitas. Season the patties with a little salt and pepper if you desire and then grill until the ground chicken is opaque throughout the burger. Do NOT undercook the burgers.
  3. Cut four pitas in half and warm them either on the top rack of your grill or in a toaster oven. Don’t overheat them or else they’ll get too crispy. Place two patties in each pita half along with diced onion and tomato. Add a healthy dollop of the cumin yogurt sauce and serve.
Notes
  1. You can grill these outdoors, but they also are delicious broiled or cooked in a frying pan. Use whatever method is most convenient for you.
Pure Sugar https://www.puresugar.net/

 I’m linking up with Sandra at Diary of a SAHM

because it’s Cooking Thursday!
Photobucket

{Recipe} Bacon-Stuffed Mushrooms

Bacon-Stuffed Mushrooms

Oh my, it’s been a while since I shared a recipe with you. Well, I’m jumping right back and and I have a delicious appetizer today! I brought this dish to “girls’ night” type thing last night and they were a hit. My husband also raved about the samples I left for him. The best part? You can whip this up in no time at all.

Now, when I think of stuffed mushrooms I think of a sausage and breadcrumb filling, or even a crabmeat filling. I love how they taste, but I’ve never attempted making my own because… well, I’m not really sure. It just seemed like a labor-intensive process. Not so with this recipe. In fact, you can make the filling ahead of time to let the flavors develop, then stuff your mushrooms later, broil, and enjoy.


Bacon-Stuffed Mushrooms
Juicy mushroom caps stuffed with a creamy mixture of bacon and cheese.
Write a review
Print
Ingredients
  1. 1 package (8 oz.) cream cheese, softened
  2. 1/2 cup crumbled bacon (or real bacon bits)
  3. 1 Tbsp. chopped scallions
  4. 1/4 tsp. garlic powder
  5. 1 lb. whole, fresh white mushrooms, stems removed
Instructions
  1. In a small mixing bowl, beat the cream cheese until it is smooth. Add the bacon bits, garlic powder, and green onion. Stir to combine. Spoon mixture into mushroom caps. Arrange mushrooms on a cookie sheet or broiler plan. Broil for 5-8 minutes until mushrooms are heated through and the tops have slightly browned. Serve warm.
Pure Sugar https://www.puresugar.net/

{Recipe} Easiest-Ever Crock Pot Potato Soup

Easiest Ever Crock Pot Potato Soup

I know. There are a million recipes for potato soup out there. But you know what? This is a recipe I have been making for years and years. I can’t remember if I started making it while in college, or just after I had graduated, but either way it’s a long time.

My friend Kelly (of the Easter Nest recipe) and I have long been Crock Pot afficianados (way before it was a cool thing again). And I consider this to be our soup. With just a few ingredients, the recipe is easy to throw together, forgiving, and (most important), super-yummy!

Easiest Ever Crock Pot Potato Soup

Easiest-Ever Crock Pot Potato Soup
Write a review
Print
Ingredients
  1. 6 cups of peeled, chopped potatoes
  2. 3 cups water
  3. 1/2 cup chopped onion
  4. 3 bouillon cubes
  5. 1/4 tsp. ground black pepper
  6. 3-4 slices American cheese
  7. 1/2 c. shredded cheddar cheese
  8. 1 12-oz. can evaporated milk
Instructions
  1. Combine potatoes, onions, water, bouillon cubes, and pepper in a 3-4 qt. slow cooker. Cover. Cook on LOW for 9-11 hours or HIGH for 4-4.5 hours.
  2. Use an immersion blender to puree the soup (or remove and carefully puree in a blender). If you prefer a chunky soup, use a masher.
  3. Add cheeses and evaporated milk to the soup. Stir to combine. Cover and cook on LOW for 1 hour more or HIGH for 30 minutes more.
  4. Serve with additional cheese, sour cream, chives, and/or bacon bits
Notes
  1. Substitute cream or half-and-half for the evaporated milk if you don't have it on hand.
  2. This recipe can easily be made vegetarian by using vegetable broth instead of water and chicken bouillion.
  3. If you have homemade chicken broth, by all means use it. This happens to be a "throw together" me for me, and bouillon cubes are a pantry staple (whereas I don't always have homemade broth).
Pure Sugar https://www.puresugar.net/

5 Easy Last-Minute Thanksgiving Dishes

5 Easy Last-Minute Thanksgiving Dishes | puresugar.net

Tomorrow is Thanksgiving and if you’re still agonizing over the menu, don’t fret! I’m sharing 5 easy recipes — 3 for side dishes and 2 for desserts. I’m actually making up the sweet potatoes today and bringing them to my in-laws’ house tomorrow!

Maple Baked Sweet Potatoes
maplebakedsweetpotatoes

Green Beans with Lemon
greenbeanswithlemon

Roasted Brussels Sprouts
sprouts

Peanut Butter Pie
peanut butter pie

Flourless Chocolate Torte
flourless chocolate torte


From our house to yours… Happy Thanksgiving!