cooking thursday: a taste of thai

I thought that Cooking Thursday would be the perfect time to share some of the recipes I made at my Thai Kitchen® Deliciously Different BBQ House Party. I was thrilled, and I mean thrilled to have been selected for this one because I love Asian cuisine, but just can’t make it at home. The Thai Kitchen and Simply Asia products are supposed to make it easier and believe me they did. They took all the “brain work” out of it. Here’s a photo of all the great samples they sent me. I can’t wait to make Red Curry, Tom Yum Soup, Coconut Rice, Spicy Thai Wings… oh, the list goes on and on!
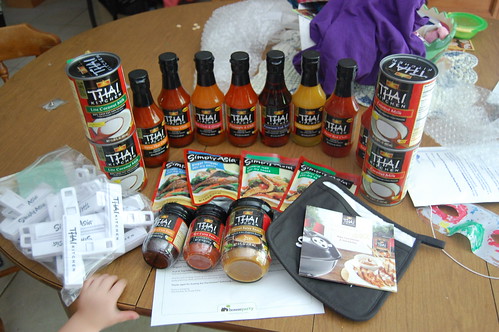
thai kitchen house party

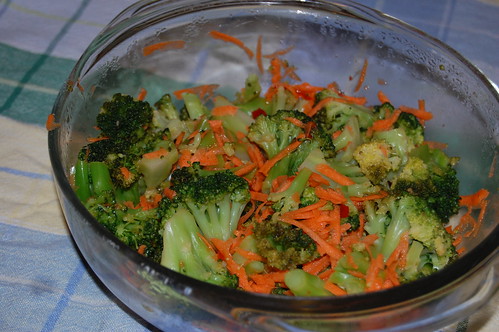
But for my party (which happened to be a get-together for my MIL’s birthday), I tried three of the suggested recipes: Chicken Satay with Peanut Dipping Sauce, Cold Thai Broccoli Salad, and Ginger Teriyaki Lettuce Wraps (this was my favorite, and it will be going into regular rotation).

Everyone loved the Chicken Satay, and considering the peanut sauce is just straight out of a jar, I was impressed with the taste. Jake’s favorite was the Broccoli Salad (seriously — I’ve never met a nearly-9-year-old who like veggies as much as this kid). He had three helpings. The best part about these recipes is that they are fast. Don’t get me wrong — I love scratch cooking and I think you all know that. But with three kids, sometimes you just suck it up and take a little help from some packaged sauces and seasonings. And with that, here are the recipes!

Ginger Teriyaki Lettuce Wraps
thai kitchen house party

1 tablespoon oil (coconut oil adds a subtle flavor, but olive or vegetable oil works too)
1 pound ground chicken or ground turkey
1 pouch Simply Asia® Ginger Teriyaki Stir-Fry Sauce
lettuce leaves (I find that Romaine or Boston lettuce works best)
Toppings: shredded carrots, bean sprouts, chopped peanuts, chopped fresh cilantro and chopped scallions

Heat oil in a large nonstick skillet on medium-high heat. Add ground turkey and cook until no longer pink. Add Stir-Fry Sauce; cook and stir until heated through. Spoon chicken mixture into the center of each lettuce leaf. Add desired toppings. Fold sides of lettuce over filling and roll up to serve.

Cold Thai Broccoli Salad
thai kitchen house party

8 cups water
4 cups broccoli florets
1/4 cup Thai Kitchen® Sweet Red Chili Sauce
1 tablespoon lime juice
1/2 teaspoon salt
1/2 cup shredded carrot

Bromg water to a boil in a large pot, add broccoli and cook just until tender. Drain and rinse under cold water. Mix chili sauce, lime juice, and salt in a large bowl with a wire whisk until well blended. Add broccoli and carrots; toss to coat well. Cover and refrigerate at least 1 hour or until ready to serve.

Chicken Satay with Peanut Dipping Sauce
thai kitchen house party

1/2 cup Thai Kitchen® Coconut Milk
2 tablespoons Thai Kitchen® Premium Fish Sauce
2 tablespoons Thai Kitchen® Red Curry Paste
2 teaspoons minced fresh lemon grass ***
1 pound boneless skinless chicken breasts, cut into 3/4-inch wide strips
Bamboo skewers
1/2 cup Thai Kitchen® Peanut Satay Sauce

Mix the coconut milk, fish sauce, curry paste and lemon grass in a small bowl until well blended. Place chicken in a large resealable plastic bag or a glass dish. Add marinade; toss to coat well and refrigerate for at least 1 hour. Remove chicken from marinade. Discard any remaining marinade. Thread chicken strips onto skewers. Grill or broil over medium-high heat until chicken is cooked through. Serve with Peanut Satay Sauce for dipping.

***I did not have lemongrass so I substituted a bit of lemon zest and some freshly grated ginger root. It tasted great to me!

Be sure to visit Sandra at Diary of a Stay at Home Mom to check out other delicious recipes!
they can’t all be winners

Am I the only one who gets absurdly disappointed when a recipe doesn’t come out as well as I thought it would? Because it’s happened twice recently.

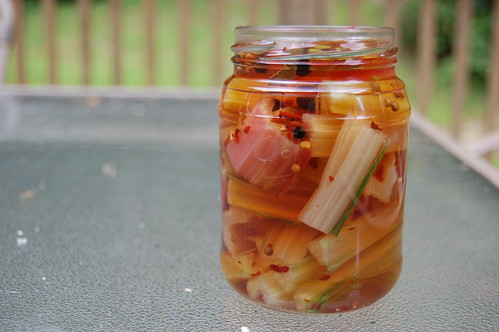
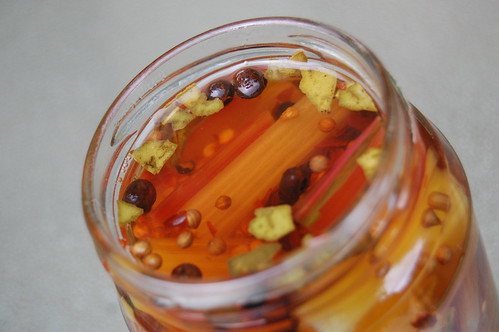
First, there was the great pickled chard disappointment. I recently wrote about trying a recipe for quick pickled swiss chard stems. I thought it sounded delicious: spicy, sour… yummy, right? And the pickles looked pretty, too:

321

318

I followed the recipe without noticing the lack of any salt. What was I thinking? Where was my brain? I let the jar sit in the fridge for a few days and then excitedly opened them at lunch.

Sour? Yes.

Spicy? Yes.

Otherwise flavorless? Yes. Unfortunately, they really didn’t taste like much other than vinegar and crushed red pepper. Not awful, but not worth eating to be honest. I think this has the potential to be a good recipe, but it definitely needs the addition of salt. (That also explains the cloudy brine )

Next up: the ho-hum breakfast cake. I was browsing Pinterest yesterday and saw a recipe for lemon-blueberry-yogurt cake. I had a few ingredients in the fridge that I needed to use up, coincidentally: lemons, blueberries, and some vanilla Greek yogurt. I thought for sure this was a sign that I just had to try the quick bread. I altered the recipe first by substituting coconut oil for canola oil, and I cut the sugar down to 3/4 cup instead of the full cup the original recipe called for. I couldn’t wait to wake up so I could eat it for breakfast!

Sorry for the crummy photos, but my camera was in the basement so I just used Instagram, and there was not a lot of light in my kitchen at 6:30 a.m.:

.

I should mention that I also reduced the amount of powdered sugar in the glaze from 3/4 cup to 1/2 cup and still had more than enough. No one in my family could agree on this cake. While I think I could cut the sugar down even further to 1/2 a cup, I liked the bread. Drew didn’t. At all. He hated the texture (it is very dense), and thought it was way too sweet (eek – imagine if I made the recipe exactly as written). Noah thought “it tasted weird.” Jake thought it was “pretty good.” But Jake isn’t too picky, either. Laura wouldn’t eat it, but she doesn’t like blueberries, so I didn’t expect her to. (Instead, she ate her scrambled egg and the proceeded to devour half of my portion.)

Drew flat out said I shouldn’t bother making this again. So I cut up the rest of the bread, packaged it, and froze it. I’ll enjoy it as a treat when I am craving something sweet. Have you made anything recently that didn’t come out well?

cooking thursday: recipe for pickled beets

There was a bunch of beets in last week’s CSA share. I have a well-documents distaste for beets. They’re pretty, but they taste like dirt. (At least to me, they do.) I’ve prepared them different ways, hoping something would be palatable, but so far nothing was doing it for me. So I turned to my last resort: pickling. Anything tastes good as a pickle. Right?

I had no idea there were so many different recipes for pickled beets. If I’d been printing them out, I’d need to buy extra laserjet toner cartridges because there really are that many. I ended up tweaking a very simple recipe that my dad said sounded like the one my grandmother used to make.

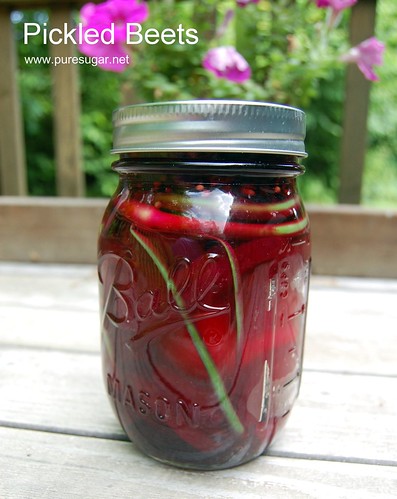
Much to my surprise, I actually enjoyed the final product! I let the pickled beets sit in the fridge for several days before I opened them, and I thought they were quite yummy. I added two garlic scapes, but I’m not sure they added much flavor. I also stuck an egg in there because I wanted to fill the jar. The pickled egg had a great flavor, too.

Quick & Easy Pickled Beets

pickled beets

1 bunch of beets (approx. 5-6 med. beets)
3/4 cup sugar
3/4 cup water
1 cup white vinegar
1 tablespoon mixed pickling spice

Trim the beets and roast (skin on) in foil at 400 degrees for about 1 hour. While the beets are roasting, bring the sugar, water, vinegar and pickling spice to a boil. Cook for 2 minutes. When the beets are ready to come out of the oven, carefully take the skins off by gently rubbing the beets with a paper towel. The skins will come right off. Slice the beets and put them in a clean jar. Pour the pickling liquid over the cooked, sliced beets. Cool to room temperature, then cover and refrigerate at least overnight or for several days.

You can certainly boil the beets instead of roasting them if you prefer. Be sure to visit Sandra at Diary of a Stay at Home Mom to check out other delicious recipes!

easy easter desserts

Easter Eggs

Are you looking for a last-minute dessert to bring to Easter dinner? Here are a few ideas for you from my blog archives!

Easter NestsEaster Nests ~
I’ve seen several variations on this cookie, but this version courtesy of my friend Kelly is by far the best!


Sugar Cookie Cake ~ Sugar Cookie Cake ~
This delicious cake is so simple, but perfect after a big dinner. Add a little whipped cream and some fresh berries to make it extra-special! (It is also insanely yummy with some lemon curd spread over the top.)


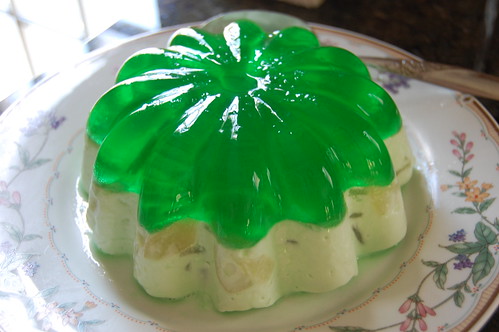
Under the Sea Jell-O MoldUnder the Sea Jell-O Mold ~
In our family, it’s just not a holiday unless Jell-O is somehow involved. My mom made this dessert for special occasions when I was growing up and it’s a great balance of creamy and fruity.


We’ll be celebrating Easter at my mother-in-law’s this year. I believe that ham and scalloped potatoes are on the menu, but I’m not sure what else. I wasn’t asked to bring anything (sniff, sniff…), but maybe I’m getting a break since I host several other holidays. I might make something anyway. If you celebrate Easter this weekend, what are you taking to dinner?

creamy indian-spiced lentils (dal)

As you are well-aware, I love Indian food. A good dal is a great recipe to have in your arsenal because it is inexpensive, delicious, and packed full of nutrition. Unfortunately, I have not had a lot of luck with many of the dal recipes I’ve tried. Either they didn’t cook down right, or else they were bland. So when I saw this recipe for “Dal Nirvana” on Budget Bytes, I was intrigued by all the rave reviews. Last week I decided to make it for lunch (even though it was scheduled for Friday’s dinner — I simply couldn’t wait that long). I made a few tweaks so the recipe better suited my tastes, and wow! Just… wow. It was absolutely delicious. I think the best part of this recipe is that it tastes great with regular lentils that you buy at any supermarket — there’s no reason to make a trip to the Indian grocery store (unless you want to, obviously!)

Creamy Indian-Spiced Lentils (Dal)

indian-spiced lentils (dal)

1 c. dry lentils
1 can (15 oz.) crushed or diced tomatoes
2 cloves garlic, finely diced
1 inch fresh ginger, finely grated
1 tsp cayenne pepper
1 tsp. cumin
1 tsp. coriander
1/4 tsp. garam masala
2 Tbsp. butter
1 Tbsp. vegetable oil
salt & pepper to taste
1/3 c. half-and-half

Pour the lentils in a medium sauce pan and cover with 1-2 inches of water. (Make sure you have checked your lentils for tiny stones first!) Bring the pot to a boil over high heat and cook for about 10 minutes, or until the lentils are tender. Drain the lentils and set aside.

Add the butter and oil to the sauce pan and melt over med-high heat. Add garlic and ginger and cook for a minute. Then add the chili powder, cumin, and coriander, salt, and pepper and fry until spices are fragrant (just about another minute or so). Return the lentils to the pot and then add the can of tomatoes along with a can full of water (or just a little bit less).

Stir everything well and then add the tomatoes. Fill the empty can with water and add that to the pot, as well. Stir everything again, bring the mixture to a simmer and the reduce the heat to low. Cover the pot with a lid and simmer for a half an hour. If the lentils are not softened or the mixture is not thick enough, continue to simmer until it reaches your desired consistency. The dish should be thick, but not dry.

Finally, stir in the half-and-half. Garnish with fresh, chopped cilantro if desired and serve with rice and yogurt.


I can’t even begin to tell you how much I love this recipe! If you’re searching for a meatless dish to try tomorrow (Good Friday), this one is definitely a winner!

Be sure to visit Sandra at Diary of a Stay at Home Mom to check out other delicious recipes!

{Recipe} Sour Patch Grapes (a.k.a. “Glitter Grapes”)


{Update April 2, 2013) – Welcome Pintester readers! What can I say? Guess these just aren’t for everyone. If you think they’re gross, that’s OK. I think beets are gross. Tomato – tomahto, right? Anyway, if you try these and aren’t impressed, here’s a tip: put the grapes in a colander and rinse off the Jell-O powder and you’re left with plain grapes again. Also? If you use a different flavor of Jell-O (I used MELON, not lime), or sugar-free, they’re probably NOT going to taste like the original recipe. Just sayin’. And finally? Guys… it’s grapes and Jell-O. I think the expectations are a little too high, LOL… 

{Update June 26, 2012} – I am completely overwhelmed by all the pins for this blog post! I am so glad that so many people are enjoying these. And thanks for all of your great suggestions in the comments. I am definitely trying them frozen this summer! Since originally posting this recipes, I have made the glitter grapes with a few different flavors, but my favorite is still either Melon Fusion or Watermelon (depending on what I find at the store). I still have not tried them with sugar-free Jell-O, but I will try to get to that. In the meantime… thanks for visiting!

Jake’s Pinewood Derby was a couple weeks ago and our den was asked to bring fruit to the event. While it is super great that they are encouraging more healthful snacks at scouting events, I was racking my brain for some way to make fruit more exciting. It couldn’t involve skewers because, well… all those crazy boys were going to be running around. I could just envision one going right through a Wolf scout’s eye or something. Shudder.

Then I remembered a link that Dara had posted on Facebook. It was for sparkly sweet grapes. Perfect! I’d had sugar frosted grapes before and enjoyed them, but I have never felt comfortable with the whole raw egg-wash thing. It’s one thing if I’m making them for a small group of people I know well, but not for a community event. There are too many people with egg allergies these days. I’d hate to be the person who made someone sick. Glitter Grapes, however, do not require anything questionable. All you need are grapes and Jell-O.

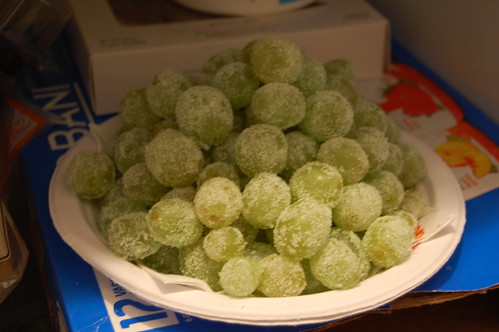
glitter grapes
I went with green grapes and Melon Fusion Jell-O. I wasn’t sure how the color of the gelatin would effect the the overall color of the grapes, so I tried to keep it in the same family.

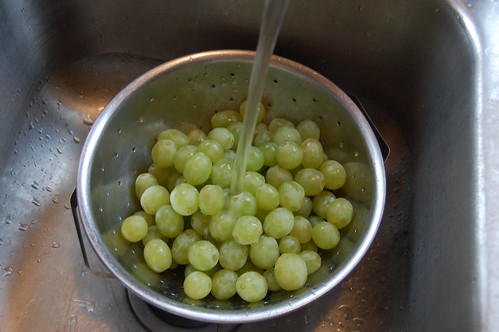
The first thing you do is thoroughly wash your grapes. Don’t skimp on the water. The grapes need to be wet in order for the Jell-O to stick to them.
glitter grapes

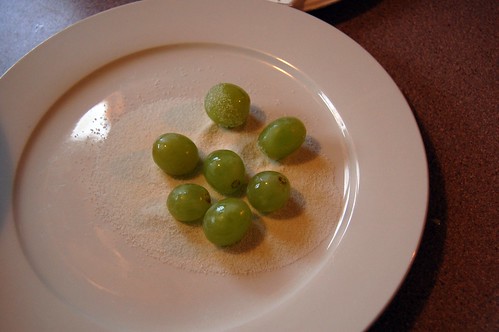
Next, pour out about 1/3 of the Jell-O powder onto a plate.
glitter grapes

Drop a handful of grapes into the powder and coat them on all sides.
glitter grapes

You can use a spoon if it’s easier. The powder tends to gunk up on your fingers (yes, “gunk up” is the technical term).
glitter grapes

Add more gelatin powder as needed and continue the process until all the grapes are covered. Refrigerate for at least 1 hour.
glitter grapes

And that’s it! I am calling them “sour patch grapes” because quite a few people thought I got my hands on some of the sugar they use on Sour Patch Kids. This recipe was seriously easy and seriously good. Believe it or not, people were actually looking for me so I could tell them how I made the grapes, LOL! And Drew overheard two boys from the Webelos II den talking about how good the glitter grapes were. He said, “If they inspired a couple 5th grade boys to talk about them long after they’re gone, I think you’ve got a winner.” Ha! 🙂 This will probably be my go-to picnic/potluck dish this summer. I’m sure other flavors of Jell-O are good, too. But I’m sticking with the melon!

Sour Patch Grapes (a.k.a. Glitter Grapes)

glitter grapes

1 pound of green seedless grapes, pulled from the stems and rinsed
1 3-oz. package of Melon Fusion Jell-O (NOT prepared)
Water
Directions

Rinse the grapes under water until all are clean and wet. Spread the gelatin mix on a plate, about 1/3 at a time. Place a handful of grapes on the plate and gently roll each grape in the gelatin powder until it is covered. Place the coated grapes into a bowl and repeat the process with the remaining ingredients until all of the grapes are covered. Place the bowl and let set in the refrigerator for at least 1 hour, until the gelatin is set. The colder these are, the better they taste!

Be sure to visit Sandra at Diary of a Stay at Home Mom to check out other delicious recipes!


cooking thursday: banana bread recipe

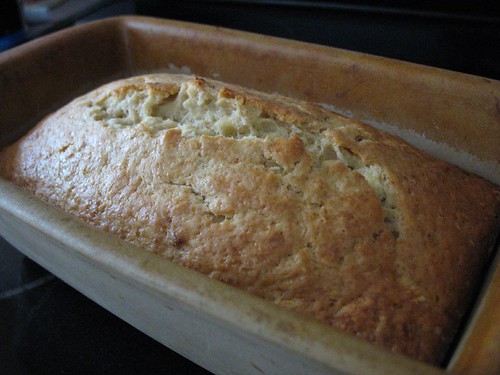
Are you sick of winter yet? Because I sure am! It’s given me the baking bug, which is not good at all for my waist line. But I do love my afternoon “coffee breaks” that usually include some kind of treat. This week I thought I’d share an old favorite: my banana bread recipe. I’ve been making this for years and I’ve passed it along to so many people. I hope you’ll enjoy it, too! I think it’s particularly good toasted with some cream cheese spread across the slice.

Banana Bread

Banana Bread

2 cups all-purpose flour
1 cup sugar
1 Tbsp. baking powder
1/2 tsp. salt
2 med. mashed ripe bananas
1/3 cup milk
1/4 cup vegetable oil (or applesauce as a substitution)
1 egg
1/2 cup chopped nuts or mini chocolate morsels (optional)

Preheat oven to 350. Spray loaf pan with nonstick spray. Combine flour, sugar, baking powder, and salt in med. bowl. Add remaining ingredients; stir just until dry ingredients are moistened. Pour batter into prepared pan. Bake 60 min. or until toothpick inserted in center comes out clean. Remove from oven to cooling rack.

Be sure to visit Sandra at Diary of a Stay at Home Mom to check out other delicious recipes!

cooking thursday: recipe for spicy black bean soup

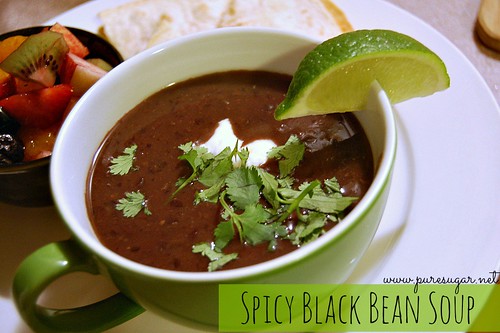
I don’t know about you, but I love soups any time of year. I started playing around with this recipe last summer and it has become one of my favorites! In my opinion, it’s almost (almost) as good as Panera’s vegetarian black bean soup — my all-time favorite! Although I have not tested this recipe in a slow-cooker, I’d bet that you could throw everything in and let it simmer away while you’re out.

Spicy Black Bean Soup

spicy black bean soup

2 15-oz. cans of black beans
1 cup chicken stock
1/4 c. diced onion
1 fresh jalapeno, minced
1 tsp. sugar
1 tsp. cider vinegar
2 cloves garlic, minced
1/4 tsp. salt
1/4 tsp. cayenne pepper
1/2 tsp. cumin
1/2 tsp. chili powder

cilantro, lime wedges, extra chopped onions, and plain yogurt or sour cream

Pour the canned beans along with their liquid into a medium sauce pan. Add the remaining ingredients and stir to combine. Gently bring the soup to a boil. Reduce heat to low and simmer, covered, for one hour. Add more water or broth as necessary.

For a creamy soup, use an immersion blender or add soup, in batches, to a blender until it reaches your desired consistency.

Ladle into bowls and garnish with cilantro, onions, yogurt or sour cream, and lime wedge. The squeeze of lime adds a lot of flavor and freshness to the soup. It’s good without it, but it’s better with it 😉

Be sure to visit Sandra at Diary of a Stay at Home Mom to check out other delicious recipes!

cooking thursday: recipe for cretons

This year I am so excited to try lots of new recipes and share them with you! Over the last few years, some of my favorite recipes have come from online friends and Sandra has some of the best. Every Thursday she has an excellent recipe sharing feature — you should join in the fun!

For the first recipe of the year, I’m sharing a recipe that admittedly looks less-than-appetizing. It’s a breakfast spread called cretons that originates in Quebec. Drew’s grandmother used to make it and when he and the boys visited Quebec last summer, he reignited his love affair with this pork dish. He begged me to try making it, and although I didn’t know what it was really supposed to taste like, I gave it a try. I looked at several recipes online (everyone seems to have their own way of making this) and combined ideas and tweaked proportions until I came up with something that sounded right. As it cooked, Drew nodded and approved of the smell, and when it was finished he told me that it tasted like Grandma’s. (Whew!) Traditionally, this spread is served on buttered toast, but we discovered that it is supremely delicious on English muffins because the nooks and crannies hold the butter.

Cretons

cretons

1 lb. ground pork
1 med. onion, finely chopped
1-2 cloves garlic, minced
1/2 teaspoon salt
3/4 teaspoon ground black pepper
1/4 teaspoon ground cloves
1/4 teaspoon ground cinnamon
1/4 teaspoon ground ginger
1/4 teaspoon nutmeg
3/4 cup milk
1/4 cup breadcrumbs (do not used seasoned)

Saute pork in a large pan until it is no longer pink. Add the onions and garlic, and cook for 1 minute, stirring to incorporate the vegetables. Stir in the salt, pepper, cloves, cinnamon, ginger, and nutmeg and cook for 1 minute. Transfer pork mixture to a food processor and pulse until the meat reaches an extremely fine consistency.

Return the pork mixture to the pan and add the milk and bread crumbs and cook for 3 minutes over medium heat. Stir well to blend everything together. Reduce the heat to low, cover, and cook, stirring occasionally, until the pork is very tender and most of the liquid is evaporated, about 1 hour. Remove the lid and cook uncovered, stirring occasionally, until the mixture is thick and all the liquid is evaporated, about 10 min. Remove from the heat and adjust the seasoning, to taste.

Transfer to a pretty bowl (though a Tupperware-type container is fine, too), and smooth the top with a spatula. Cover tightly with plastic wrap (or a lid) and refrigerate until well chilled and firm, at least 4 hours or overnight.

Serve on buttered toast or English muffins.

Be warned: this pork pate is incredibly addictive. I didn’t plan on trying it because it looked and smelled a little weird to me, but because I made it I figured I needed to give it a try. I am fairly sure that the cretons is to blame for my holiday weight gain, LOL!

Be sure to visit Sandra at Diary of a Stay at Home Mom to check out other delicious recipes!

Sugar Cookie Cake

Sugar Cookie Cake

For some reason I cannot make a decent sugar cookie to save my life, and that’s when I turn to this recipe. It’s yummy with whipped cream (OK, I used Cool Whip — sue me) and berries, it’s awesome with some lemon curd spread on top, and I want to make a raspberry sauce to drizzle on top before the cake is all gone. You could add chocolate or toffee chips, cinnamon, heck even blueberries in the batter would probably be amazing. It’s one versatile little cake and I hope you enjoy the recipe as much as we do!

Sugar Cookie Cake

3/4 c. cold butter
3 c. flour
1 1/2 c. buttermilk *
2 eggs, beaten
1 tsp. vanilla
2 c. sugar
1 tsp. baking soda

Preheat oven to 350 degrees. In a large bowl, mix butter, sugar, and flour into crumbs. Reserve 1 cup of crumbs. Add 1 tsp. of baking soda to the buttermilk, and then add this to the rest of the crumbs. Add in the eggs and vanilla; mix well and pour into a greased 9×13″ pan. Top with the 1 cup reserved crumbs.

Bake at 350 for 35-40 minutes (or until cake tester comes out clean).

I find that this cake tastes best warm, so if you’re not eating it straight from the oven, just warm it for about 20-30 seconds in the microwave.

* I rarely have buttermilk on hand. As a substitution for use in this recipe, add 1 1/2 Tbsp. of lemon juice or white vinegar to a measuring cup and then fill it until the 1 1/2 cups mark. I’ve used both types of acid with successful results, so use what you have on hand.