Category Archives: Home & Garden

In the Garden

welcome to my garden

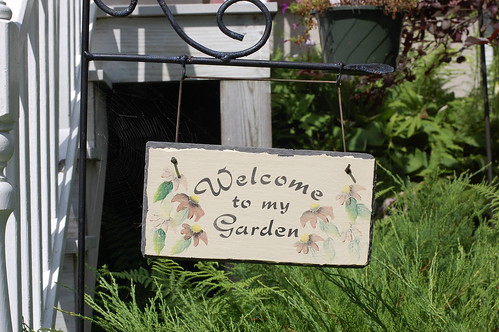
Well, this year my garden is overgrown and underwhelming. The one-two punch of some heavy rains and two weeks of crazy hot weather made the weeds go crazy and sadly I’m just not motivated to keep up with it. (Happens every year — I’m a gardener in my head, but not in reality, LOL!) But I figured I’d share a few snapshots of the plants that haven’t died!

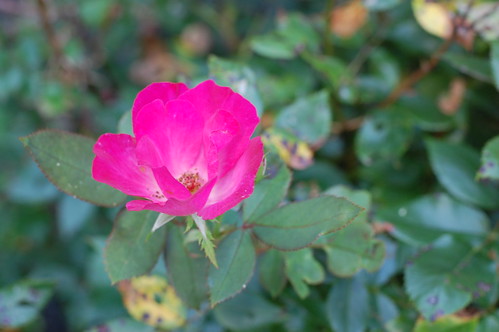
First, there’s my knockout rose bush. This is one of the hardiest plants we have in the front! And what’s amazing is that a few years ago, I bought the plant half-head on clearance for $1, just to see if it would take. I love how bright the pink is.

rose

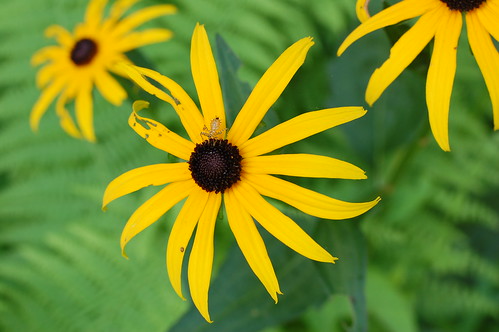
Then there are these Black-Eyed Susans that came from my mother-in-law’s garden.

flowers

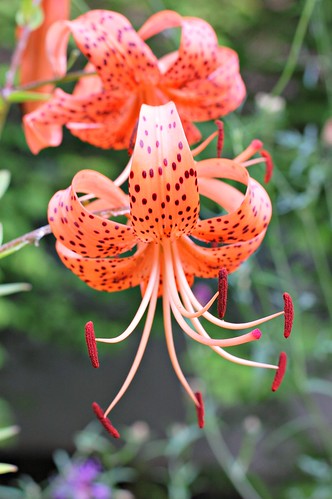
And the Tiger Lily from my mom’s garden.

tiger lilies

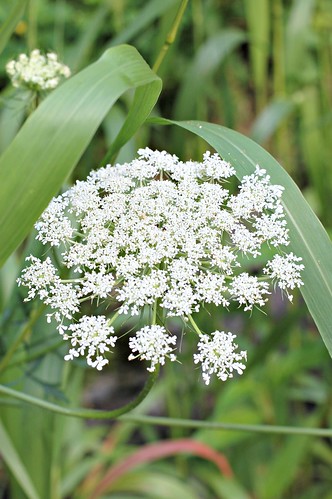
Even though Queen Anne’s Lace might be considered a weed, I love having it around the house. It’s so pretty and delicate and when I feel motivated to cut some flowers to bring in the house, the Queen Anne’s Lace makes such lovely filler.

queen anne's lace

This one is called a Balloon Flower and I think we might have gotten it as a bare-root plant from Spring Hill. We placed an order when we first moved here and while a lot of the plants didn’t take, a few did! The flowers close up in the evening and look like little balloons.

balloon flower

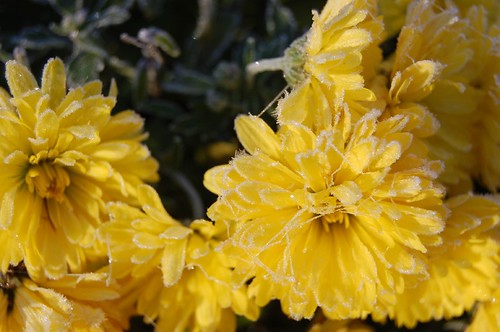
And here’s the Spoon Flower my dad made. This one is pretty rare 😉

spoon flower

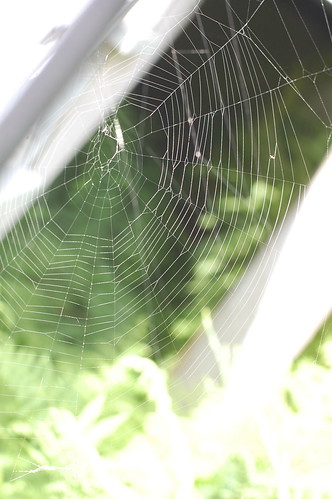
I found this spiderweb this morning and I never tire of how magical they look. I left it alone — I feel bad anytime I have to wipe one away. I know it’s silly, but they just seem like so much work and this web wasn’t in a place where it was bothering anyone.

spider web


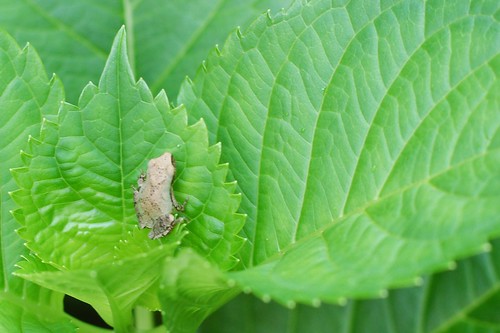
And finally, my hydrangea. I had only one pathetic bloom last year and it doesn’t look like I’ll have any flowers this year (no idea why!). I did, however, find this adorable little toad hanging out on a leaf! 

tiny frog

Maybe in September I’ll put out some mums and marigolds and kale… I’ll try to take advantage of fall flowers and pretty things up for autumn. So, how are your gardens doing this year?

How to Clean the Glass on Your Wood Stove or Fireplace

how to clean wood stove glass

Remember how I just was asking about a January thaw? Well, the last two days were it! Sure, it was wet and foggy, but temperatures were mild for this time of year and I even had a chance to air out the house a little. Since we weren’t using our wood stove, I decided to take advantage of the burn break and give it a good cleaning.

After cleaning out all the ash and soot, it looked better, but I had to do something about that glass. Ugh, what a mess!

how to clean wood stove glass

how to clean wood stove glass

Soot really sticks to the glass and it can be a real PITA to clean… if you don’t know the secret. That’s right. There is a simple, easy way to accomplish this task. And best of all, you already have everything you need. And it is environmentally-friendly. No harsh cleaners, no ammonia, nothing of the sort.

Please note: ONLY DO THIS WITH A COLD WOOD STOVE OR FIREPLACE!!! Do not try to do this if you still have smoldering ash. Give your stove a good 24 hours to cool down after burning, and even then check to make sure there are no more embers. You do not want to burn yourself.

Here’s what you need:
how to clean wood stove glass

  • Newspaper
  • Water
  • (and the secret ingredient)… ash from your stove or fireplace

Simply wad up a sheet of newspaper and dip in a bowl of warmish water.

Then, reach into your (COLD, please!!!) stove and get a little ash on there. I know, I know… What? How on earth is spreading dirty soot on the surface of my already dirty glass going to help matters? Well, the ash is an abrasive, sort of like pumice, and really helps scrub away the residue from burning wood.

how to clean wood stove glass

how to clean wood stove glass

Depending upon how dirty your glass is, you’ll more than likely need to use a little elbow grease. This is just a secret… it ain’t magic, my friends. You still have to do a little work. But you should see results almost immediately.

how to clean wood stove glass

Change sheets of newspaper and repeat the process until you achieve your desired cleanliness. Then, get yourself a spray bottle filled with water and some paper towels to rinse off the wet soot and shine it all up.
how to clean wood stove glass

This whole project took me maybe 10 minutes and I am so happy to have a clear window again!

how to clean wood stove glass

how to clean wood stove glass

Ta-da! And now we get to mess it all up again as the cold weather has returned and we’re back to our regular use.

First Snow of the Season

First snow of the season

Thankfully it wasn’t enough to even cause a school delay this morning, but yes we got our first snowfall of the season! It looked so pretty as it came down late yesterday afternoon. Laura couldn’t wait to get outside, so we bundled up for a few minutes and I (of course) couldn’t help but snap a few shots.

First snow of the season

First snow of the season

First snow of the season

First snow of the season

First snow of the season

First snow of the season

It’s still quite windy, though. I can’t lie — I was pretty happy when she finally agreed to go inside to warm up!

{Tutorial} Country Christmas Crochet Garland

crochetgarland

It’s Election Day! I’ll be voting this evening, as my polling location is adjacent to the library and I’m working there for a couple hours tonight. Every year we have an election day raffle to help support our little library, so the hours are extended to correspond with voting hours. This year I decided to whip up this sweet country Christmas garland for the raffle. It’s such a fun project (not to mention instant gratification), that I just had to share it with you!

crochetgarland3

For the garland, you’ll need:

  • about 50″ of jute twine
  • homespun fabric
  • worsted weight yarn (I used acrylic)
  • “H” hook
  • darning needle, scissors

crochetgarland2

There are a few patterns out there for these granny-style crochet Christmas trees. I tinkered around to come up with a shape I liked, but by all means use your favorite!

Crochet Christmas Tree Motif

Abbreviations:

Ch = chain
SC = single crochet
DC = double crochet
Sl St = slip stitch

Start with a magic circle.

Round 1: Ch 3 (the Ch 3 always counts as the first DC stitch), 3 DC, ch 2, 4 DC, ch 2, 4 DC, ch 2. Slip stitch to the top of the beginning ch 3 st. (Three clusters of 4 DC and three ch 2 spaces.)

Round 2: Sl st over to the first ch 2 space of the previous round. Ch 3. 3 DC, ch 2, 4 DC in this space. *Ch 2, 4 DC, ch 2, 4 DC in next ch 2 space. Repeat from * in the last ch 2 space. Ch 2. Sl st to the top of the beginning ch 3 stitch. (Six clusters of 4 DC and six ch 2 spaces.)

Round 3: Sl st over to the first ch 2 space. Ch 3, 3 DC, ch 3, 4 DC in the space. *Skip three DC of the previous row. SC in the next (fourth) DC (this will be the DC immediately before the ch 2 space). 4 DC in the next space. Skip three DC of the previous row. SC in the next DC. 4 DC, ch 3, 4 DC in the next space. Repeat from * along the second side of the tree. Ch 1. 4 DC in the next ch 2 space. Ch 1. Sl st to the top of beginning ch 3.

Tree Trunk: Turn work. Sl st into first DC.  Ch 3. DC in the next 3 DC stitches. Turn so that the front of the tree is facing you. Ch 2 (counts as the first SC). SC in the next three DC stitches of the previous row and top loop of starting ch. Finish off and weave the yarn end into the back of the tree.

If you don’t want to use a magic circle, you can certainly start with a Ch5, and connect the beginning and end with a slip stitch and then work out of the center of that loop you create. I just think the magic circle makes neater work.

After you accumulate your little stack of trees, it’s time to assemble the garland. You’ll need 9 trees (you could also use 11 if you want them closer — that’s up to you). You’ll need 9 (or 11) 7ish-inches x 1/2 inch pieces of homespun fabric. And you’ll need your jute.

howtocollage

Take a piece of fabric and form a loop. Stick the bottom of the loop through the topmost hole in your tree (1). Lay the jute over the two fabric ends (2). Pull the ends through that loop (3). Then just tighten up the knot until your tree is securely attached to the jute (4).

Repeat this for every tree you’ve crocheted.  Then slide the trees around until you have the spacing you want and voila! You have a quick and easy Christmas garland to hang across your mantle, the front of your entertainment center, across a mirror, wherever!

crochetgarland4

If you make this project, be sure to post a link in the comments. I’d love to see your creations!


Linking up with:

A (Light) Green Thumb

Seems as though one of my cherry tomatoes is having an identity crisis.

I really should take some photos of the plants around our house.(Of course, things are not as beautiful as they were a few weeks ago, but…) This year I’ve made a real effort to take care of the flowers around our home. We don’t have a whole lot of extra stuff like gazing balls or outdoor wall fountains, but we have our giant turtle sculpture, our happy frog, and some garden flags. It’s enough to accentuate the ivy, begonias, various bushes, impatiens, and plants I can’t identify.

Heck, I even kept a cherry tomato plant alive (as evidenced above)! Next year I’d like to dive into vegetable gardening a little more. I’m not ready for a big backyard garden, but I’d like to try a few more things in containers. Maybe I’ll get lucky again!

Ridiculously Easy Initial Wreath

DSC_0212

I have been getting quite a bit of crafting done lately, which has been awesome! It’s a combination of finding just the right items at just the right price, and the fact that Laura is starting to play a little more independently, allowing me bits of time to play 🙂 Last weekend I completed a project I’ve been wanting to do for a long time: make a new wreath for our front door.

I wish we could have a really cool painted front door, but our house is mahogany and stained a reddish-brown. Honestly, there aren’t a lot of colors besides white or cream that look good with it, so it definitely needs a bit of adornment. When I found a big “B” on clearance at Michael’s, I was totally inspired! Then, when I was at Hobby Lobby and I found burlap ribbon, my life was made much easier.

Basically, I took a straw wreath and wrapped it with the burlap ribbon, securing the back with floral greening pins (like these). I carefully positioned my letter so that I could feed ribbon through the top, allowing me to change it with the seasons. Then I hot-glued the letter to the wreath, arranged my silk flowers (hot-glueing when necessary and hoping it will peel off easily when I decide to change up the wreath), and fed the ribbon between the wreath form and the “B” to create the hanger.

And voila! A new wreath that I made in less than an hour (complete with interruptions). The real genius of this wreath, though, is how it is hung. My mom gets all the credit for this idea. Basically, I created a loop at the top of the ribbon (yep, again with my hot glue), and cut a slit for the wreath hanger to slide into. Here are a couple pictures — hopefully they make it clearer.

DSC_0222

DSC_0220

DSC_0223

This way, the ribbons doesn’t get all twisted and you can use one of those inexpensive wreath hangers from the dollar store. So far it’s holding up great! I am sure you could sew the ribbon in addition to glueing it to make it extra secure.

Anyway, I am really happy with the way it turned out and now my front door is a little more welcoming.

Baby Birds

When I was a kid, our kitchen sink faced a window. And there was a metal canopy over the window to keep the sun out. One spring a little bird decided to build a nest in the right-hand corner. I remember how excited we all were to have this perfect view of a mama bird and her eggs! My parents named her “Matilda.” (And occasionally we’ll still make a Matilda reference to this day.)

Anyway, it was great… for a while. The thing about birds is that they are messy. And loud! Who’d think that something so small could make so much noise? Well, this spring we had Matilda, Jr. at our house. A bird (species yet to be identified) decided to build her nest behind the outside lamp on our deck. Of course, every time I opened the screen door, the mama bird would fly off and I’d feel bad. But hey — sometimes you just need to take your kid out to play on the swingset!

I did manage to snap a few photos, though and thought I’d share them!

May 30:
Robin's nest behind my porch light.

June 11:
Baby birds! Good thing we plan on power washing the house soon (after the birds are gone obviously).

June 14:
And just like that my baby birds are gone :-( At least I can was the lamp and siding I guess.


(See what I mean about birds being messy?) Well, now that they’re gone I can take down the nest I guess. We need to powerwash the siding, so I am really glad those birdies had their chance to hatch! Once we clean up the side we’re (finally) putting up the bird bottle the kids gave Drew for Father’s Day several years ago. Maybe next year the birds will nest in there.

It’s A Miracle! My Grout is Clean!

DSC_0011

This is such a horrifying post to write, because I feel like it makes me look like a terrible housekeeper since the grout in my kitchen is so gross. But I have a feeling a lot of people struggle with the issue of cleaning grout. When we moved in (eight years ago!), we had no idea that the builder never sealed the grout on our kitchen tile floor. (And it’s a huge kitchen). It didn’t take long for the dirt to set in.

Over the years I’ve tried various methods of grout cleaning and nothing seemed to work. Then, the other day I was browsing Pinterest when I stumbled upon the miracle of miracles — a grout cleaner that does the job! Hat tip to Accessorize and Organize for this amazing discovery!

Could it really be this simple? Yes. Yes it could. Yes it is. Just… YES!!! All it is, is one part bleach to three parts baking soda. How amazing is that? OK, you might think that I’m way too excited about this, but lately the grout has really been getting me down and I was at a loss. But just look at this:

DSC_0008

DSC_0012

Shut the front, door! Right? Of course, now that I have something that works, I will be scrubbing my kitchen and hallway floors every night for the next two weeks until the job is done, but hey… I can live with that. Then you bet I’m getting my butt to the hardware store for some grout sealer.

DIY Homemade Grout Cleaner Paste

1/4 cup bleach
3/4 cup baking soda

Mix together until a paste forms. Apply to grout lines and use a toothbrush to scrub. Leave the paste on for an addition 10 minutes and then wipe clean with a damp cloth.

I can’t believe what little effort it took to clean the grout. The dirt just melted away. The recipe as given above does not make a whole lot, so you will probably need to make several small batches depending on the size of your tiled area. The one caveat: cleanup is a huge PITA. The baking soda likes to stick to the tile, so just be aware of that. Even so, it’s just time-consuming and not difficult, so if you really want your grout clean (like I do!) it’s worth the effort!

let’s grow!

At the end of this month, we’ll have lived in this house for eight years! That seems crazy to me. Aside from the home in which I grew up (that we moved out of when I was 16), this is the longest I’ve stayed in one place. It doesn’t seem that long ago that I was heading out to Boston after I graduated from college. Or doing searches like “title loans Connecticut” when I needed to buy a car after relocating to Fairfield. But now I think it’s safe to say that the Hudson Valley is home sweet home.

This year I am determined to spruce up the outside of our home sweet home, and I’ve started by clearing out what seems like a metric ton of leaves – ugh! While I love all the trees on our property, they make such a mess when the leaves fall.

I have grand plans for actually taking care of my roses, for planting some more colorful perennials, and even adding two large planters near our front steps. The only thing is… I’m no gardener. My thumb is black as night and I am very lazy when it comes to caring for plants. Hopefully I’ll find the motivation this year, though. I’d love to add a little more curb appeal.